← All Campaign Guides

Tacticus Octarius Mirror Campaign Guide

Beat every Octarius Mirror Normal and Elite stage with recommended Imperial teams, investment targets, and replay-backed strategies.

Replay data updated:

Overview

Timing

Clear first. Medal later. Build Burchard first, open useful farming nodes, and let reusable Imperial supports carry as much of Elite as possible.

Octarius Mirror unlocks after Sword Brother Godswyl, Brother Burchard, and Ancient Thoread are obtained. Normal remains comparatively approachable, but several trio-only stages prevent supports from replacing investment in the required Black Templars entirely.

Push Normal for new nodes even when a stage awards fewer than three medals. All 225 Normal medals unlock Elite, but forcing promotions only to perfect a stage is often less efficient than returning after broader account upgrades.

Every Elite battle allows five heroes, so Elite is a flexible account-roster test rather than a required-trio-only campaign. Recommended Investment targets are practical planning goals—not record-low clears that may depend on a Diamond carry, perfect enemy movement, or repeated attempts.

Progression

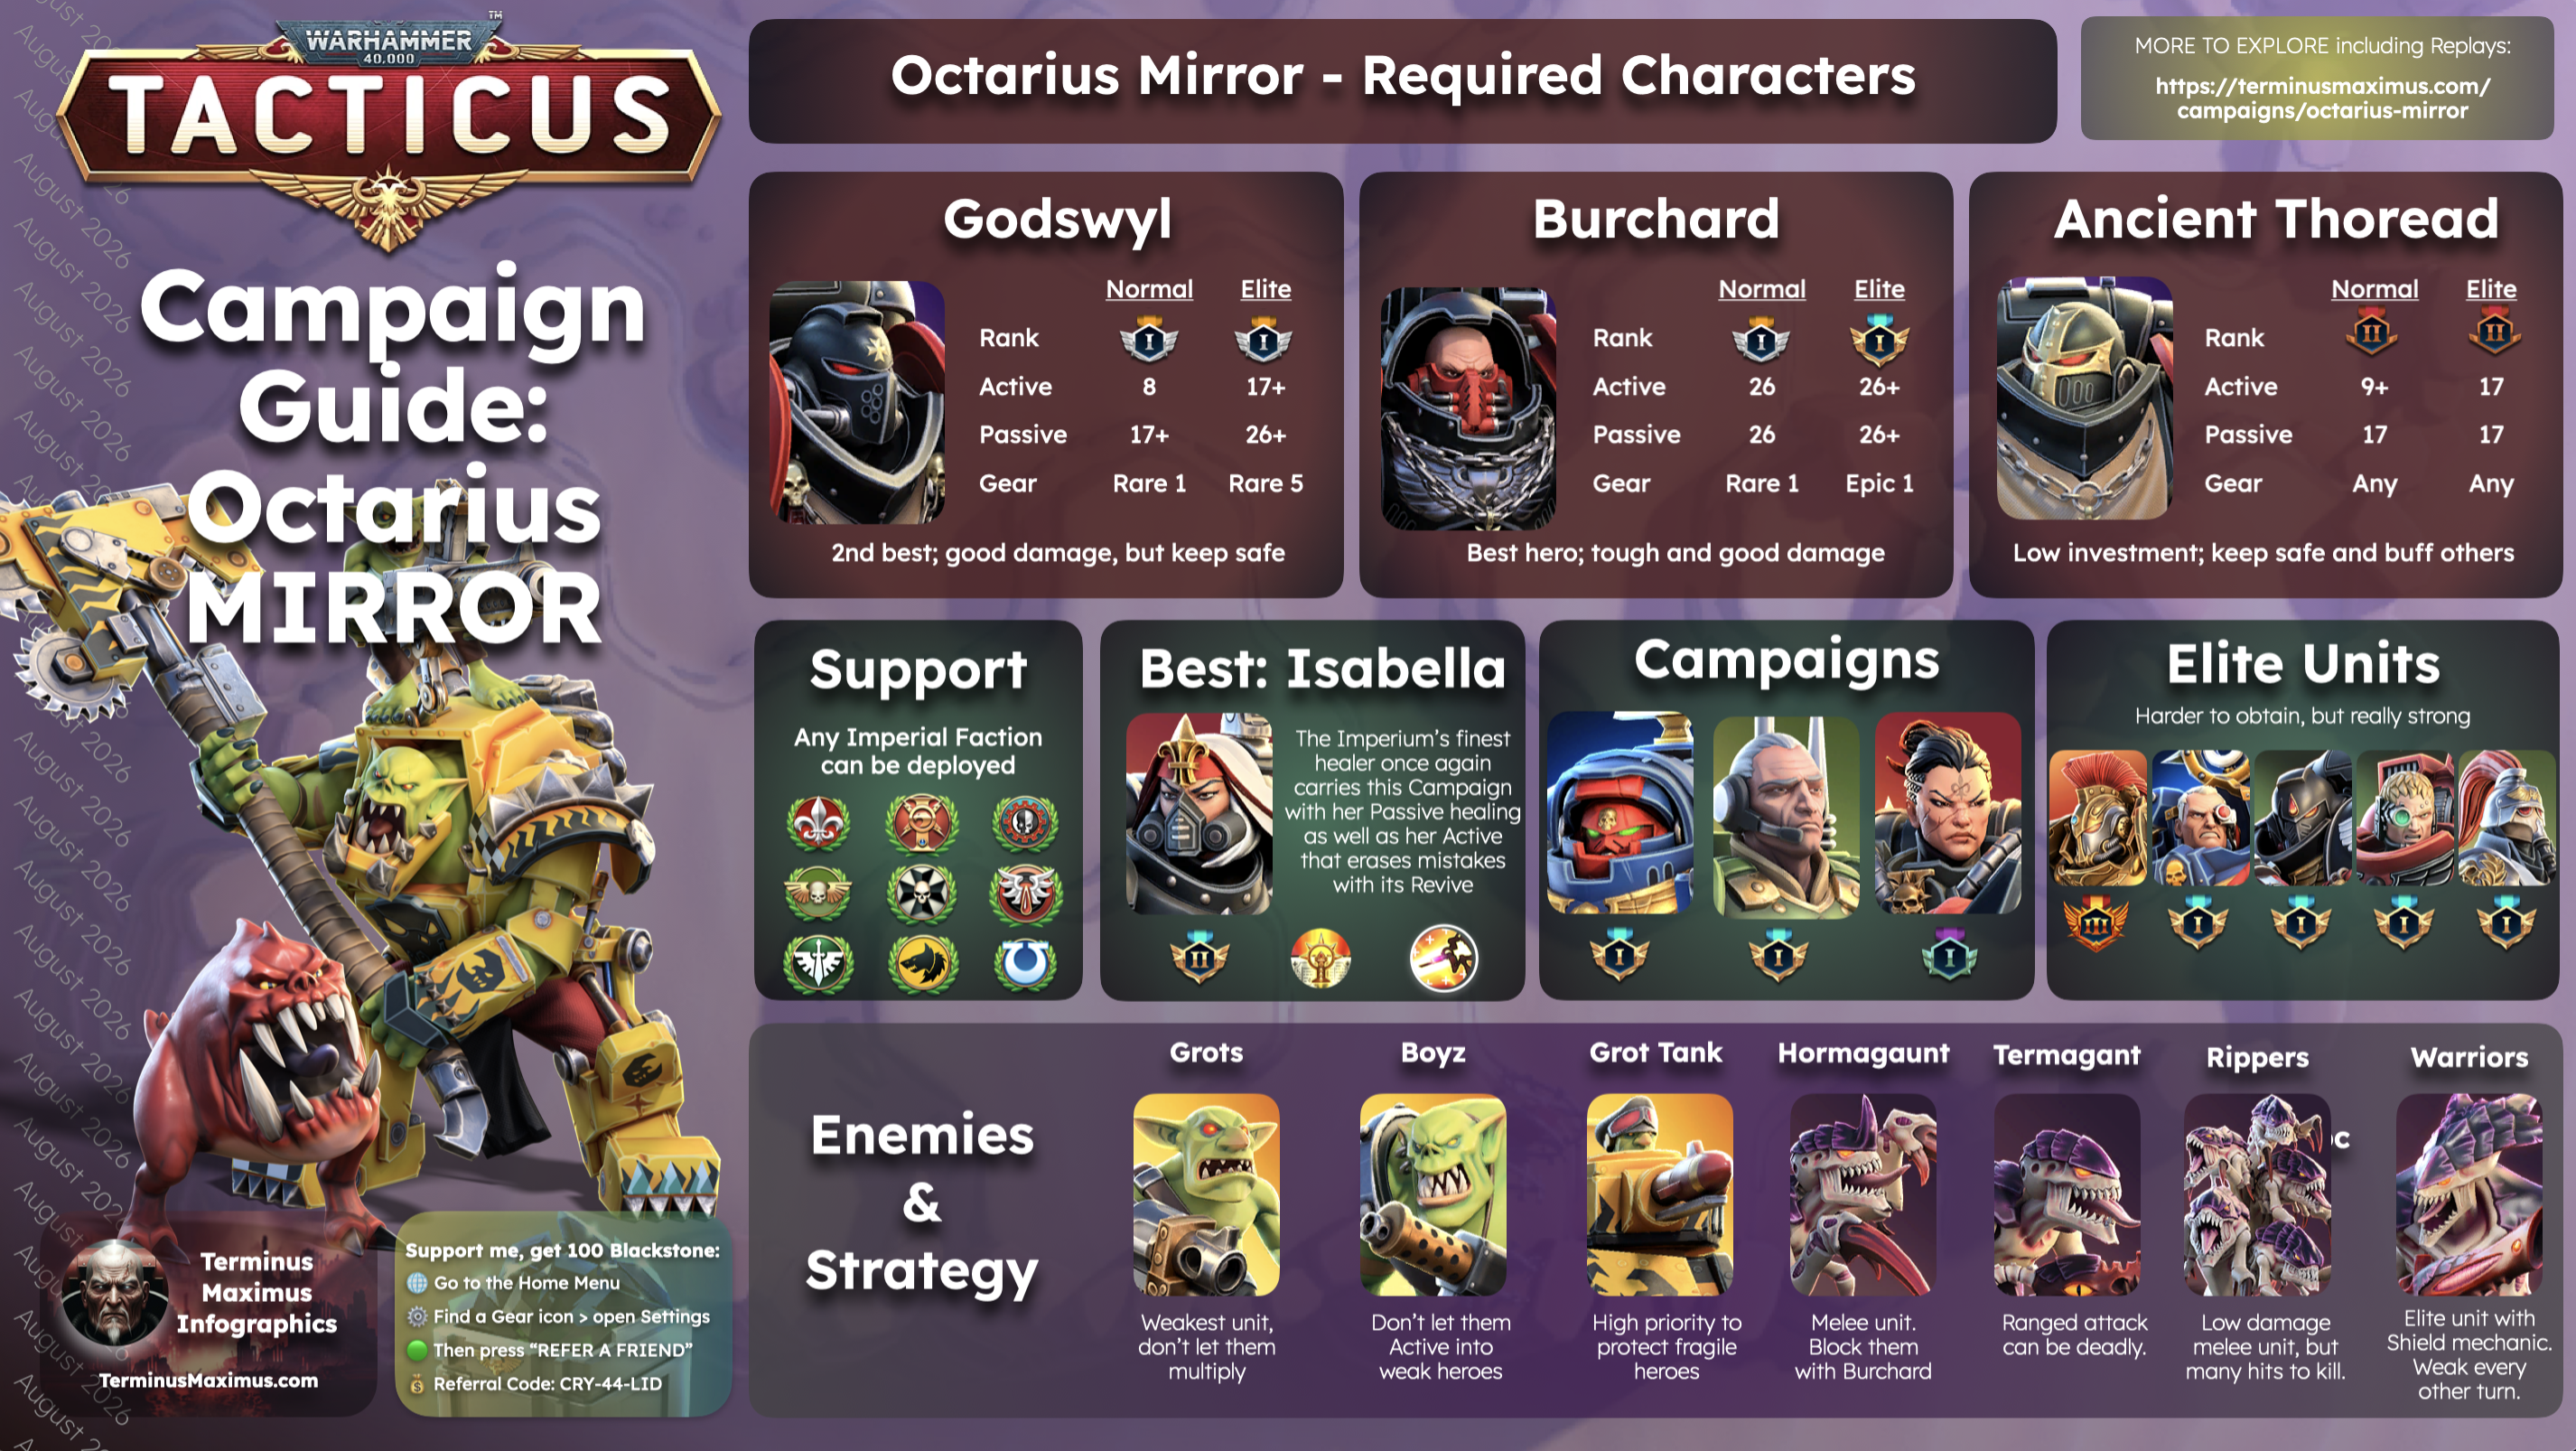
Required Carry: Burchard. Best Support: Isabella. Pair the trio with a reusable Imperial carry and survival specialist throughout Elite.

Treat the campaign as a progression loop rather than one uninterrupted completion project.

  1. Unlock Godswyl, Burchard, and Thoread to open Octarius Mirror.
  2. Push Normal and open its efficient farming nodes.
  3. Build Burchard first; raise Godswyl second and Thoread only as survival requires.
  4. Use Bellator, Thaddeus, or Vindicta when Normal deployment allows support.
  5. Bring Isabella whenever she is available and survival is the bottleneck.
  6. Return for all 225 Normal medals when Elite is the next useful goal.
  7. Enter Elite with the Normal-ready trio and the strongest eligible Imperials already on the account.
  8. Upgrade the hero that actual attempts identify as the bottleneck instead of leveling the trio evenly.

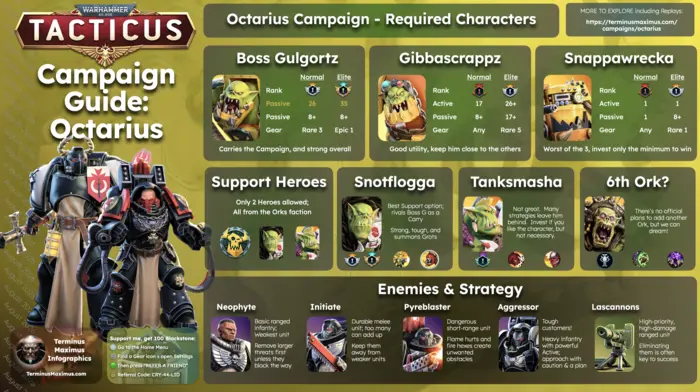
Eligible support factions are all Imperial factions: Adepta Sororitas, Adeptus Custodes, Adeptus Mechanicus, Astra Militarum, Black Templars, Blood Angels, Dark Angels, Space Wolves, and Ultramarines.

Recommended Investment

Normal Investment

HeroRankActivePassiveWeaponDefense
Sword Brother Fedreus Godswyl Silver I rank Godswyl active ability8+ Godswyl passive ability17+ 1 1
Brother Raimund Burchard Silver I rank Burchard active ability26 Burchard passive ability26 1 1
Ancient Cantus Thoread Bronze II rank Thoread active ability9+ Thoread passive ability17 1 1

Elite Investment

HeroRankActivePassiveWeaponDefense
Sword Brother Fedreus Godswyl Silver I rank Godswyl active ability17+ Godswyl passive ability26+ 1 5
Brother Raimund Burchard Gold I rank Burchard active ability26+ Burchard passive ability26+ 1 1
Ancient Cantus Thoread Bronze II rank Thoread active ability17 Thoread passive ability17 1 1

Strategy & Tips

Build Burchard First

Burchard is the Required Carry. Use his Gravis durability to anchor the dangerous lane and his repeated area damage to thin packed Orks, Grots, and Tyranids.

Use Godswyl for Control

Godswyl's stun and push can remove a dangerous enemy from Thoread's route, change board geometry, and buy an entire round against one priority target.

Keep Thoread Central and Protected

Thoread supports nearby allies. Keep him close enough to contribute without making him the easiest target, and raise his survivability only when he is the unit costing medals.

Start With Isabella

On open stages, Isabella is the best survival and three-medal support. Keep Burchard and the likely casualty adjacent to her while avoiding unnecessary area-damage exposure.

Add a Carry, Not Just Power

Use Bellator for durable summons, Thaddeus for ranged priority removal, or Vindicta for dense low-health packs. Choose the hero that solves the stage's actual weakness.

Let Summons Take the Hit

Summoned units can occupy approach hexes and absorb attacks without costing campaign medals. Delay a summon when waiting produces more bodies or better lane control.

Diagnose Failed Medals

If a required hero is one-shot, improve that hero's gear or rank. If damage is short, strengthen the carry. If attrition wins, improve healing and positioning before promoting everyone.

Required Heroes

Sword Brother Godswyl, Brother Burchard, and Ancient Thoread are mandatory throughout Octarius Mirror. Normal includes several required-trio checks, while every Elite battle allows two eligible Imperial supports.

Sword Brother Fedreus Godswyl portrait

Sword Brother Godswyl

Role: Melee damage, stun and push control, and permanent armor reduction.

Godswyl controls the most dangerous target; use his movement to reshape the fight, not merely chase damage.

Rank
Normal Silver I rank Elite Silver I rank
Active
Normal8+ Elite17+
Passive
Normal17+ Elite26+
Weapon
Normal 1 Elite 1
Defense
Normal 1 Elite 5

Godswyl is the trio's mobile single-target specialist. Thunderous Assault pushes and stuns a dangerous enemy, then advances him into the vacated space when possible.

Champion of the Feast adds Power damage after movement and permanently reduces armor, making Godswyl an excellent opener for Burchard or an external Imperial carry.

His main risk is exposure. Use the stun to protect Thoread or break a dangerous lane, and prioritize defensive equipment when he is dying after committing to melee.

Ancient Cantus Thoread portrait

Ancient Thoread

Role: Protected defensive support and melee force multiplier.

Build Thoread to survive and amplify the team—not to become the primary damage dealer.

Rank
Normal Bronze II rank Elite Bronze II rank
Active
Normal9+ Elite17
Passive
Normal17 Elite17
Weapon
Normal 1 Elite 1
Defense
Normal 1 Elite 1

Thoread is a support fighter rather than the natural carry. Unbreakable Duty reduces damage for him and nearby allies, while Astartes Banner adds a melee hit to nearby friendly units.

Keep him central enough to support Burchard and Godswyl but off the obvious enemy route. Sending him to an isolated target gives up much of his value and makes a lost medal more likely.

He is the clearest required hero to hold near minimum viable survivability. Invest further when trio-only Normal stages or actual Elite attempts show that he is the limiting factor.

Supporting Heroes

Supporting heroes dramatically reduce the investment Octarius Mirror demands. Every Elite battle allows five heroes, so pair the required Black Templars with a reusable Imperial carry and a survival or control specialist.

Best

Campaign Comrades
Sergeant Bellator portrait

Bellator

Role: Accessible Imperial carry, durable frontline support, and summon engine.

Bellator is the account-efficient carry: bring the investment you already need for Indomitus.

Bellator is the best broadly accessible external carry. He is already a core Indomitus investment, and his Inceptors add bodies, block routes, absorb attacks, and pressure enemy packs without risking campaign medals.

He complements Isabella rather than competing with her: Bellator supplies action economy and a second durable anchor while Isabella protects the deployed roster.

Thaddeus Noble portrait

Thaddeus Noble

Role: Long-range priority removal, area pressure, and Suppression.

Let the Templars hold space while Thaddeus removes the threat that space cannot contain.

Thaddeus gives the melee-heavy Black Templars safe ranged reach. Use Basilisk Barrage or his long-range attack to remove Grot Tanks, Termagants, Warriors, or another target that threatens the protected formation.

He is especially useful when the stage punishes forward movement or when Burchard needs help solving damage before the enemy reaches the line.

Battle Sister Vindicta portrait

Vindicta

Role: Accessible area damage and dense-pack clearing.

Burn the crowd without burning the formation's escape route.

Vindicta is an inexpensive answer to Grots, Ork Boyz, Hormagaunts, and other enemies that arrive in clusters. Many accounts already have her, so the investment can pay off early.

Plan Flame hexes around Godswyl and Thoread. Burning terrain can block the compact movement and adjacency that the required trio and Isabella formation need.

Elite Heroes
Kariyan Helsates portrait

Kariyan

Role: High-investment carry and durable frontline support.

Bring the monster you already built; do not build the monster only for Octarius Mirror.

A heavily developed Kariyan can hold a dangerous edge, remove priority targets, and compensate for lower required-hero investment throughout Elite.

His best use is bringing an existing high-end account investment into Octarius Mirror, not starting a campaign-specific build.

Marneus Calgar portrait

Marneus Calgar

Role: Premium frontline wall, area damage, and ally support.

Calgar makes the frontline exceptionally hard to break while the required trio works safely.

Calgar gives Burchard a second durable body and helps protect Thoread from fast Ork or Tyranid pressure while contributing meaningful area damage.

He is especially comfortable in an Isabella formation, but should be treated as an established-account option rather than a beginner expectation.

Lucien portrait

Lucien

Role: Mobile damage carry and rapid threat removal.

Solve incoming damage by deleting its source.

Lucien can protect the formation by deleting a dangerous ranged unit, Tyranid Warrior, or exposed boss support before it acts.

He does not heal or resurrect the required trio, so his offense must prevent more damage than a survival support would restore.

Mataneo portrait

Mataneo

Role: Mobility, temporary bodies, and enemy-targeting disruption.

Mataneo wins space, and space keeps Thoread alive.

Mataneo reaches priority targets while his additional bodies block routes and change enemy targeting. Those bodies are especially useful against dense melee packs and do not cost campaign medals when defeated.

Use his mobility to preserve the Burchard–Isabella core rather than pulling the formation apart.

Lord Marshal Varnan Dreir portrait

Lord Marshal Varnan Dreir

Role: Durable charging frontliner and self-sustaining pressure.

Dreir protects the trio by moving the fight somewhere else.

Dreir moves the fight away from vulnerable required heroes. His charge pressure and self-sustain can contain a dangerous lane or force enemies to turn away from the compact formation.

He does not replace Isabella's healing, but he can prevent damage through pressure, positioning, and durability.

Difficult Stages

Normal deployment restrictions and late-Elite enemy pressure define the most important Octarius Mirror gates. Replay ranks vary widely, so use low-investment clears as proof of possibility—not as a universal beginner baseline.

Normal
63

Normal 63 — Late Required-Trio Check

Why players struggle

A very late trio-only deployment removes every Imperial support and exposes weak required heroes before the final run.

Strategy

  • Put Burchard on the safest exposed engagement hex.
  • Use Godswyl's stun and push to keep the most dangerous target away from Thoread.
  • Keep Thoread central but off the obvious attack route.
  • Move the best defensive equipment to the hero who is actually dying.

Closing note

This is the reminder that supports lower investment but cannot replace the required trio everywhere in Normal.

75

Normal 75 — Boss Gulgortz

Why players struggle

The final Normal boss uses a substantially stronger modern kit than the version shown in many older completion videos.

Strategy

  • Control surrounding Ork pressure before committing to the boss.
  • Use Burchard and a durable support to hold the dangerous edge.
  • Keep Isabella adjacent to the likely casualty when available.
  • Save Godswyl's stun for the turn it prevents lethal pressure rather than spending it for marginal damage.

Closing note

Treat old videos as map references, not current damage or survival thresholds.

Elite
24

Elite 24 — Snotflogga

Why players struggle

Summons and board saturation can overwhelm underbuilt required heroes even with two support slots.

Strategy

  • Bring area damage or crowd control.
  • Use summons to contest approach hexes before enemy bodies fill them.
  • Keep Thoread inside the protected core.
  • Clear dangerous accumulations before focusing entirely on the boss.

Closing note

Control the board first; Burchard's repeatable area damage is more valuable than scattered single-target attacks.

30

Elite 30 — Tyranid Swarm

Why players struggle

A dense twelve-enemy Tyranid wave rewards sustained area damage, durable chokepoints, and healing.

Strategy

  • Funnel melee bodies into Burchard.
  • Use Bellator summons to create artificial chokepoints.
  • Burst Tyranid Warriors before cleaning up weaker gaunts.
  • Avoid splitting the Isabella formation across multiple lanes.

Closing note

Enemy count is the pressure: make each action remove or delay more than one threat.

No dedicated replay row is available for this stage yet. Use the campaign filters and the trio formation principles above.

32

Elite 32 — Tanksmasha

Why players struggle

Fast melee pressure can bypass a loose frontline and remove the weakest required hero.

Strategy

  • Keep Thoread off the obvious engagement lane.
  • Use Godswyl's stun and push to buy a full round when possible.
  • Focus the boss only after the backline is protected.
  • Use Isabella or another survival support to preserve the medal margin.

Closing note

Control the boss's first contact; do not let speed decide the target for you.

No dedicated replay row is available for this stage yet. Use the campaign filters and the trio formation principles above.

39

Elite 39 — Late Tyranid Survival Check

Why players struggle

Late-Elite Tyranid pressure makes formation integrity and three-medal survival more important than speed.

Strategy

  • Bring the strongest reusable Imperial carry already on the account.
  • Keep a healer or survival support beside the likely casualty.
  • Use area damage and summons to prevent surrounds.
  • Raise only the required hero who actual attempts show is failing.

Closing note

Do not pre-build the trio evenly; let the failed attempt identify the next upgrade.

40

Elite 40 — Boss Gulgortz

Why players struggle

Modern Gulgortz combines a durable boss profile with WAAAGH-era Ork Boy pressure and late-Elite damage.

Strategy

  • Bring the strongest carry plus Isabella or another survival specialist.
  • Control the summoned and surrounding Orks before they open the formation.
  • Let Burchard anchor the dangerous lane while Thoread stays protected.
  • Collapse on Gulgortz only when the required trio can survive the cleanup.

Closing note

A pre-rework OME 40 clear does not define a 2026 minimum; build for the current fight and your own support roster.

Bosses

Octarius Mirror bosses appear at Normal 15, 30, 45, 60, and 75, with their Elite encounters at 8, 16, 24, 32, and 40.

Snappawrecka portrait

Snappawrecka

Normal 15Elite 8

Modern Snappawrecka is tougher and more dangerous than the early version found in old videos.

Use Burchard to absorb pressure and focus him before his damage compounds across the formation.

Gibbascrapz, da Spezulist portrait

Gibbascrapz

Normal 30Elite 16

His summon-oriented fight rewards board management and decisive target priority.

Do not spend so long on peripheral bodies that additional units take over the deployment space.

Grumbal Snotflogga portrait

Snotflogga

Normal 45Elite 24

Expect summon and board-saturation pressure.

Burchard's area damage and Bellator's disposable summons provide more safety than forcing extra investment into Thoread.

Olog Tanksmasha portrait

Tanksmasha

Normal 60Elite 32

Keep the weakest required hero off his obvious engagement lane.

Use Godswyl's stun and push when it buys a round of safety rather than merely adding damage.

Gulgortz Bulldoza portrait

Boss Gulgortz

Normal 75Elite 40

His modern kit is materially stronger than the boss shown in pre-2024 campaign videos.

Control WAAAGH-era Ork Boy pressure, protect the required trio, and commit to the boss only after the formation is stable.

Campaign Replay Filters

Stuck on a specific stage? Select the difficulty and stage number to compare team compositions, hero ranks, and successful strategies.

Every recommendation on this page is supported by campaign research, documented clears, or the Terminus Maximus Campaign Replay Library. Use the filters below to find successful Octarius Mirror runs for any available Normal or Elite stage.

Compare teams carefully. A low-rank required trio may depend on stronger equipment, Isabella, a heavily developed Imperial carry, favorable enemy movement, or exact turn-by-turn positioning. The most useful replay is the one whose full five-hero roster and investment most closely resemble your own.

More Filters

Campaign Replays

Normal 60 2 replays Isabella MarikenSergeant Bellator
Normal 61 2 replays Isabella MarikenSergeant Bellator
Normal 62 2 replays Isabella Mariken
Normal 63 2 replays
Normal 64 2 replays Isabella MarikenSergeant Bellator
Normal 65 2 replays Isabella MarikenSergeant Bellator
Normal 66 2 replays Isabella MarikenSergeant Bellator
Normal 67 2 replays Isabella MarikenSergeant Bellator
Normal 68 2 replays Isabella MarikenSergeant Bellator
Normal 69 2 replays Isabella MarikenSergeant Bellator
Normal 70 2 replays Isabella MarikenSergeant Bellator
Normal 71 2 replays Isabella Mariken
Normal 72 1 replay
Normal 73 2 replays Isabella MarikenSergeant Bellator
Normal 74 2 replays Isabella MarikenSergeant Bellator
Normal 75 3 replays Sergeant BellatorIsabella Mariken
Elite 1 2 replays Sergeant BellatorIsabella MarikenCommissar Sebastian Yarrick
Elite 2 2 replays Sergeant BellatorIsabella MarikenCommissar Sebastian Yarrick
Elite 3 1 replay Isabella MarikenCommissar Sebastian Yarrick
Elite 4 1 replay Isabella MarikenCommissar Sebastian Yarrick
Elite 5 1 replay Isabella MarikenCommissar Sebastian Yarrick
Elite 6 1 replay Isabella MarikenCommissar Sebastian Yarrick
Elite 7 1 replay Isabella MarikenCommissar Sebastian Yarrick
Elite 8 1 replay Isabella MarikenCommissar Sebastian Yarrick
Elite 9 1 replay Isabella MarikenCommissar Sebastian Yarrick
Elite 10 1 replay Isabella MarikenCommissar Sebastian Yarrick
Elite 11 1 replay Isabella MarikenCommissar Sebastian Yarrick
Elite 12 1 replay Isabella MarikenCommissar Sebastian Yarrick
Elite 13 1 replay Isabella MarikenCommissar Sebastian Yarrick
Elite 14 1 replay Isabella MarikenCommissar Sebastian Yarrick
Elite 15 1 replay Isabella MarikenCommissar Sebastian Yarrick
Elite 16 1 replay Isabella MarikenCommissar Sebastian Yarrick
Elite 17 1 replay Isabella MarikenCommissar Sebastian Yarrick
Elite 18 2 replays Isabella MarikenThaddeus NobleCommissar Sebastian Yarrick
Elite 19 1 replay Isabella MarikenCommissar Sebastian Yarrick
Elite 20 1 replay Isabella MarikenCommissar Sebastian Yarrick
Elite 21 1 replay Isabella MarikenCommissar Sebastian Yarrick
Elite 22 1 replay Isabella MarikenCommissar Sebastian Yarrick
Elite 23 1 replay Isabella MarikenSergeant Bellator
Elite 24 1 replay Isabella MarikenSergeant Bellator
Elite 25 1 replay Isabella MarikenSergeant Bellator
Elite 26 1 replay Isabella MarikenSergeant Bellator
Elite 27 1 replay Isabella MarikenSergeant Bellator
Elite 28 1 replay Isabella MarikenSergeant Bellator
Elite 29 1 replay Isabella MarikenSergeant Bellator
Elite 34 1 replay Celestine, the living SaintSergeant Bellator
Elite 35 1 replay Marneus CalgarSergeant Bellator
Elite 36 1 replay Isabella MarikenThaddeus Noble
Elite 38 1 replay Isabella MarikenThaddeus Noble
Elite 39 1 replay Isabella MarikenThaddeus Noble
Elite 40 1 replay Marneus CalgarSergeant Bellator

Campaign Replay Statistics

These ranks change as you apply Filters

Sword Brother Fedreus Godswyl portrait
GodswylElite: 35 stagesNormal: 16 stages
Max Rank
Bronze III rank badge
Bronze III
Brother Raimund Burchard portrait
BurchardElite: 35 stagesNormal: 16 stages
Max Rank
Gold I rank badge
Gold I
Ancient Cantus Thoread portrait
ThoreadElite: 35 stagesNormal: 16 stages
Max Rank
Silver I rank badge
Silver I
Isabella Mariken portrait
IsaElite: 32 stagesNormal: 14 stages
Max Rank
Gold III rank badge
Gold III
Sergeant Bellator portrait
BellaElite: 12 stagesNormal: 12 stages
Max Rank
Diamond III rank badge
Diamond III
Commissar Sebastian Yarrick portrait
YarrickElite: 22 stagesNormal: 0 stages
Max Rank
Gold I rank badge
Gold I
Thaddeus Noble portrait
ThadElite: 4 stagesNormal: 0 stages
Max Rank
Diamond I rank badge
Diamond I
Marneus Calgar portrait
CalgarElite: 2 stagesNormal: 0 stages
Max Rank
Diamond III rank badge
Diamond III
Celestine, the living Saint portrait
CeleElite: 1 stageNormal: 0 stages
Max Rank
Silver III rank badge
Silver III

More to Explore