← All Campaign Guides

Tacticus Fall of Cadia Mirror Campaign Guide

Beat every Fall of Cadia Mirror Normal and Elite stage with recommended Imperial teams, investment targets, and replay-backed strategies.

Replay data updated:

Overview

Timing

Complete Normal relatively early, farm its efficient nodes, and return to Elite when the guaranteed drops justify the investment.

Fall of Cadia Mirror becomes available after Kut Skoden, Sibyll Devine, and Thaddeus Noble are unlocked through the original Fall of Cadia campaign. It is a useful early-to-midgame project because Mirror nodes offer efficient, specialized farming.

Push Normal for new nodes even when a stage awards fewer than three medals. Earning all 225 Normal medals unlocks Elite, but forcing expensive promotions solely to reach Elite can be a poor trade for a developing account.

Elite becomes more attractive once the account has a strong shared Imperial support core. Its guaranteed first upgrade copy makes several Astra Militarum and general progression nodes especially valuable.

Progression

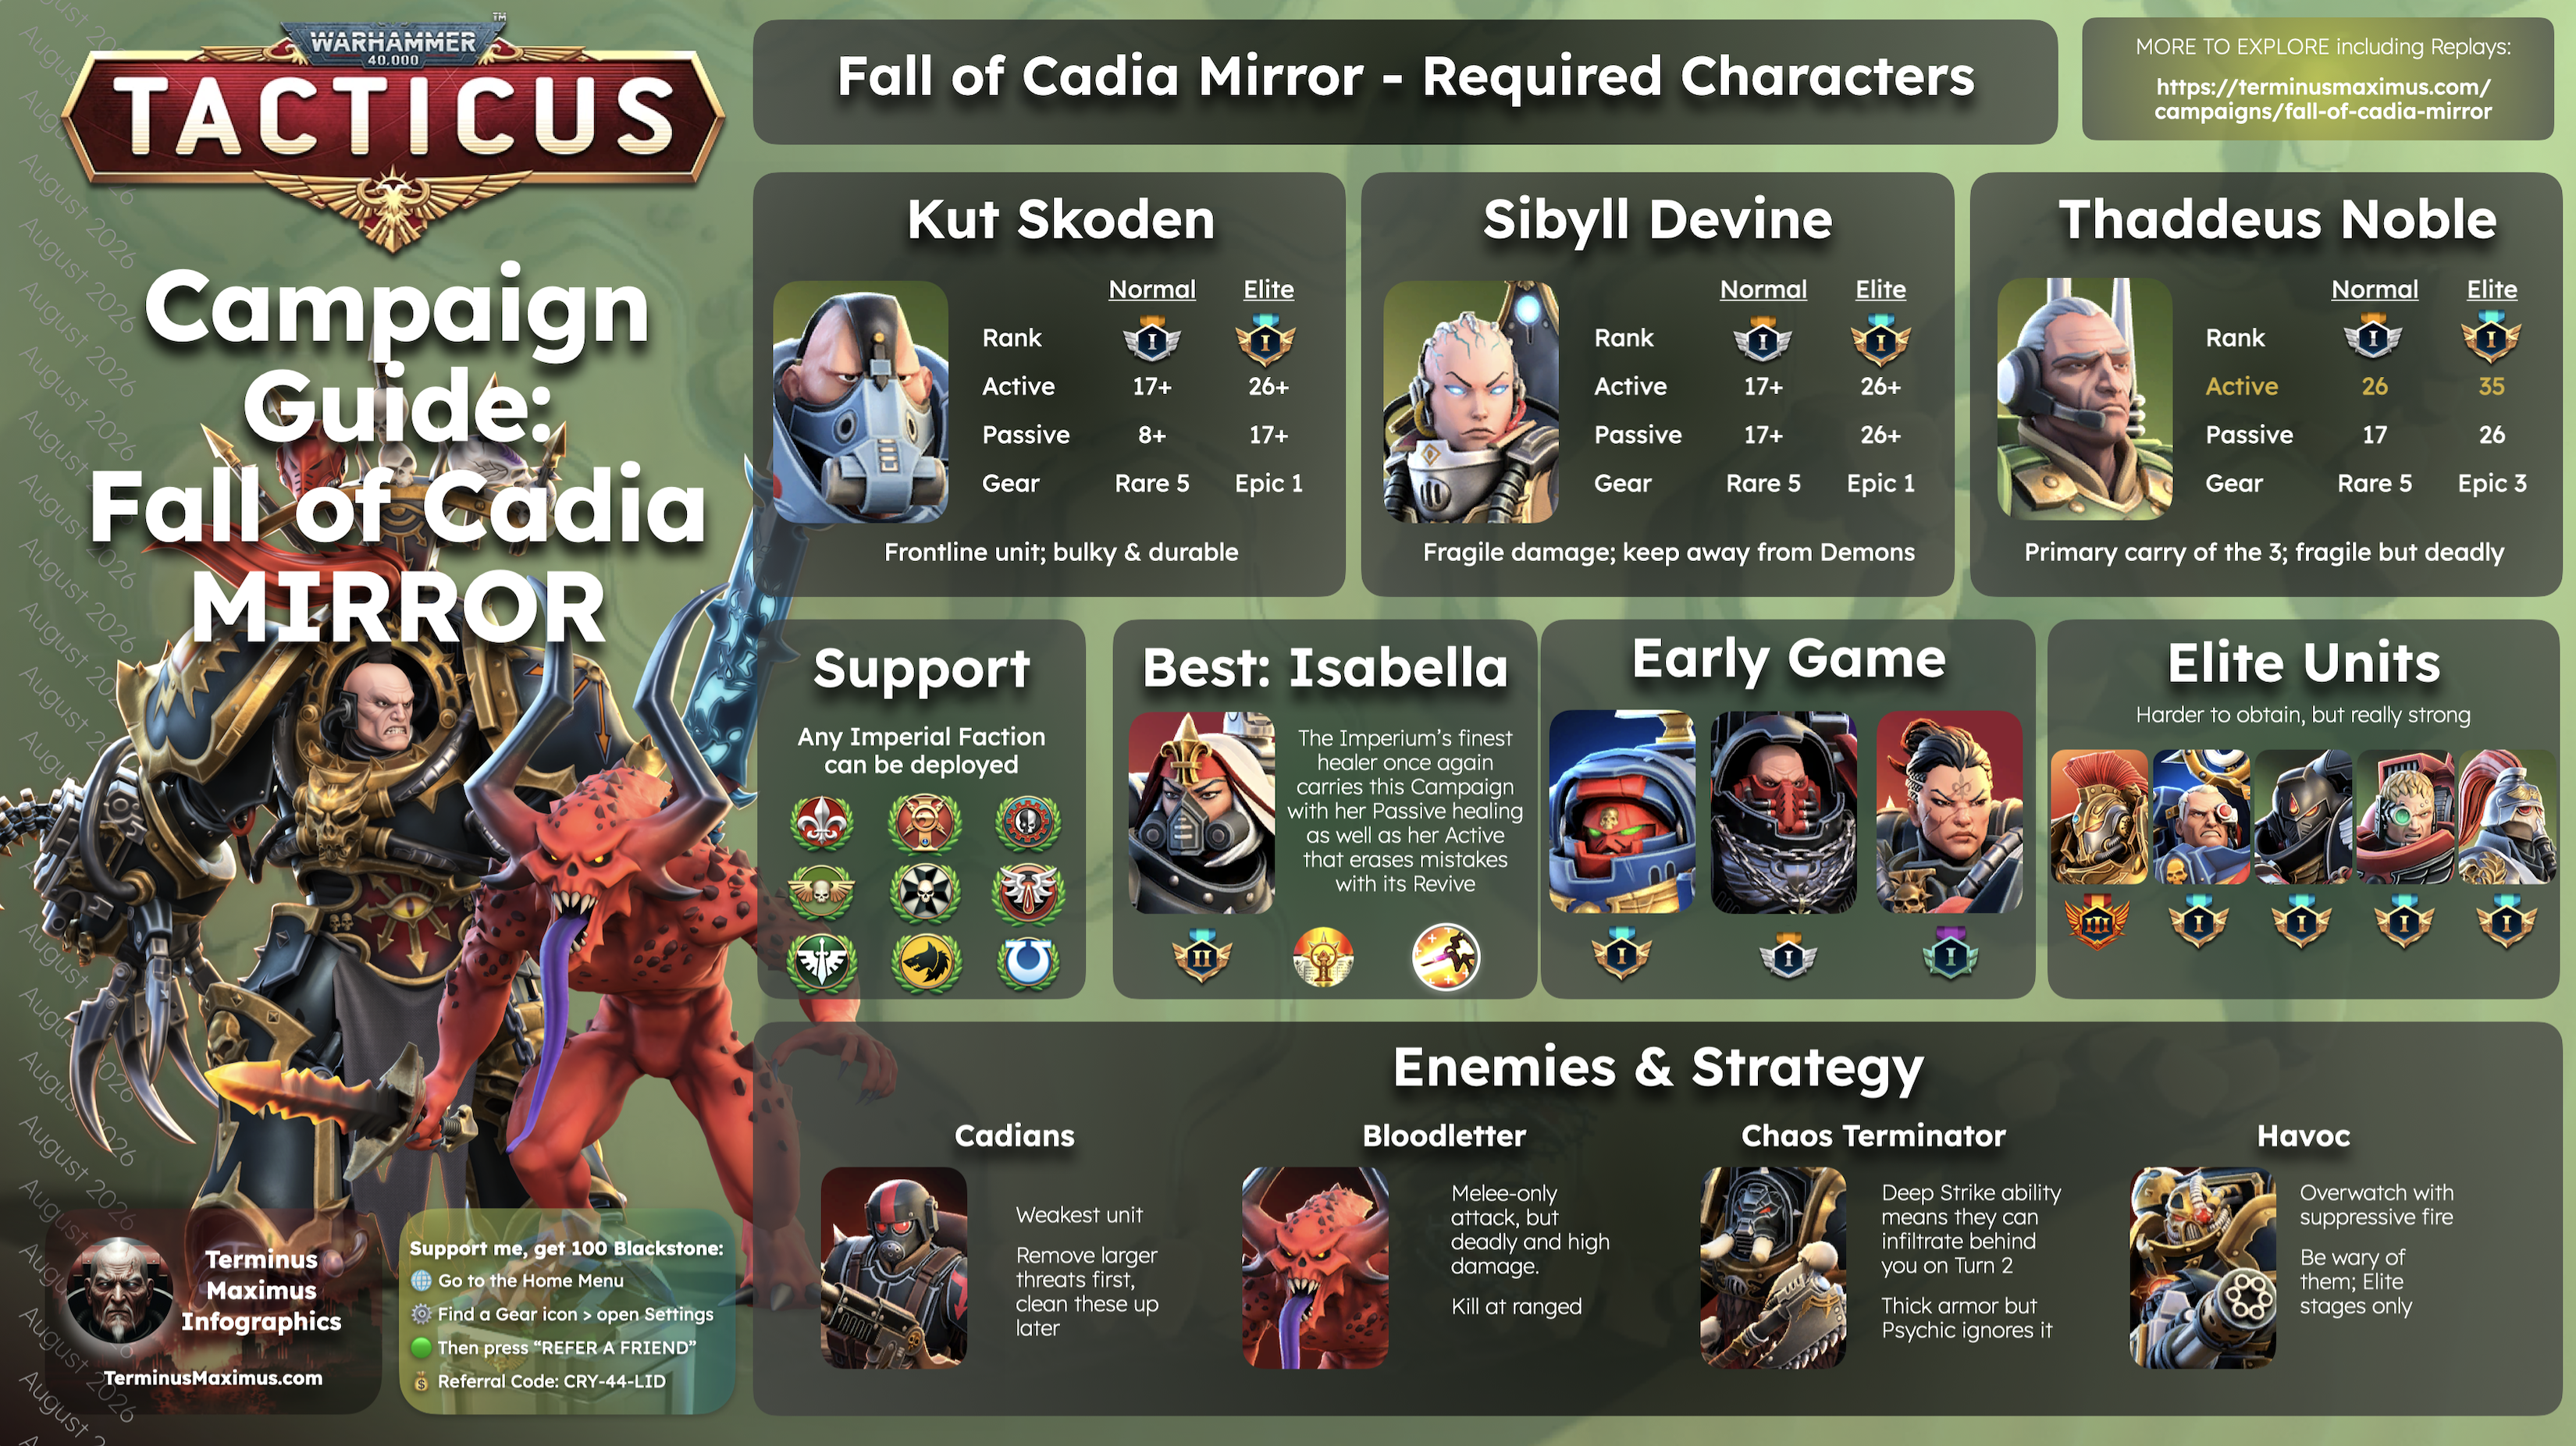
Thaddeus carries, Kut screens, Sibyll supplies protected Psychic and Infiltrate utility, and Isabella is the MVP whenever supports are permitted.

Treat the campaign as a progression loop rather than one uninterrupted completion project.

  1. Unlock Kut, Sibyll, and Thaddeus through Fall of Cadia.
  2. Push Normal and open its efficient farming nodes.
  3. Build around Thaddeus instead of equalizing the required trio.
  4. Use Kut as the forward screen and keep Sibyll protected.
  5. Bring Isabella whenever the deployment rules allow her.
  6. Return for all 225 Normal medals when Elite is the next useful goal.
  7. Strengthen the required trio for Elite 2, 12, 29, and 36.
  8. Add shared-account Imperial supports for the remaining Elite stages.

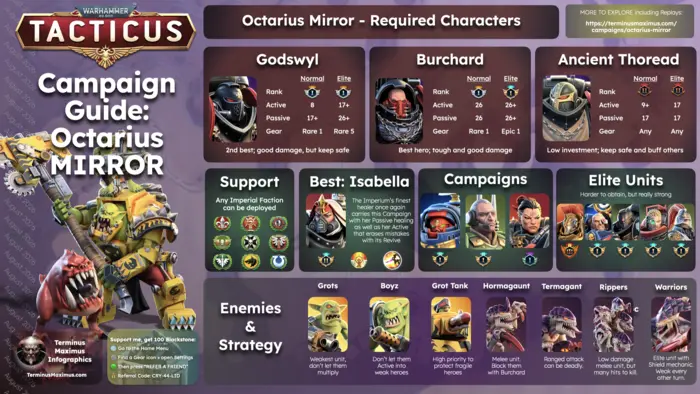
The current documented support list is Adepta Sororitas, Adeptus Custodes, Adeptus Mechanicus, Astra Militarum, Black Templars, Blood Angels, Dark Angels, Space Wolves, and Ultramarines. Do not assume every Imperial faction is eligible.

Normal mixes three-, four-, and five-character deployments. Elite 2, 12, 29, and 36 allow only Kut, Sibyll, and Thaddeus, so no support hero can replace investment in the mandatory trio.

Recommended Investment

Normal Investment

HeroRankActivePassiveWeaponDefense
Kut Skoden Silver I rank Kut active ability17+ Kut passive ability8+ 1 5
Sibyll Devine Silver I rank Sibyll active ability17+ Sibyll passive ability17+ 1 5
Thaddeus Noble Silver I rank Thad active ability26 Thad passive ability17 5 5

Elite Investment

HeroRankActivePassiveWeaponDefense
Kut Skoden Gold I rank Kut active ability26+ Kut passive ability17+ 1 1
Sibyll Devine Gold I rank Sibyll active ability26+ Sibyll passive ability26+ 1 1
Thaddeus Noble Gold I rank Thad active ability35 Thad passive ability26 3 3

Strategy & Tips

Use a Screened Ranged Wedge

Put Kut on the forward collision hex, keep Thaddeus one layer behind with clear range-three lines, and place Sibyll on a protected lateral or back hex.

Make Thaddeus the Carry

Use Basilisk Barrage for priority targets, protected clusters, and Havoc Suppression. Preserve clear firing lanes and avoid committing Thaddeus before the Barrage decision is made.

Keep Sibyll Protected

Sibyll supplies Psychic damage and lets adjacent allies begin the turn with Infiltrate. She should enable safe movement through Overwatch, not walk into the lane herself.

Start With Isabella

On unrestricted stages, position Isabella behind the frontline and adjacent to the heroes most likely to take damage. Her healing and resurrection create the safest three-medal margin.

Solve Havoc Overwatch First

Suppress Havocs with Thaddeus before moving, cross with an ally that began beside Sibyll, or reposition and bait. Do not force an exposed move through an active lane.

Keep Bloodletters Off Sibyll

Bloodletters gain extra pressure into Psykers. Let Kut or another durable frontliner receive the charge while Sibyll remains screened.

Clear First, Medal Later

If one hero dies, diagnose the exact failure before promoting everyone. Positioning, defensive gear, Isabella, or one focused Thaddeus upgrade may add the needed margin more efficiently.

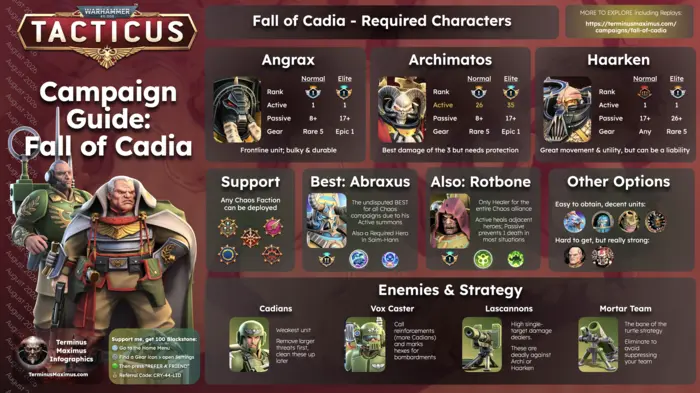
Required Heroes

Kut Skoden, Sibyll Devine, and Thaddeus Noble are mandatory throughout Fall of Cadia Mirror. Elite 2, 12, 29, and 36 restrict deployment to this trio, making focused required-hero investment essential.

Kut Skoden portrait

Kut Skoden

Role: Frontline screen, durable collision point, and backline protector.

Kut screens: make him the safe answer to the enemy's first contact.

Rank
Normal Silver I rank Elite Gold I rank
Active
Normal17+ Elite26+
Passive
Normal8+ Elite17+
Weapon
Normal 1 Elite 1
Defense
Normal 5 Elite 1

Kut's primary contribution is often the attack that Sibyll or Thaddeus never receives. Put him on the forward collision hex, block direct routes into the backline, and let enemies spend their opening pressure on him.

His physical bulk is especially important on restricted stages where Isabella and other supports cannot deploy. Move the best available defensive equipment onto him when the trio is failing to survive an enemy turn.

Do not judge Kut only by damage. Screening, body-blocking, and controlling who the enemy can reach are the foundation of the campaign's safest formation.

Sibyll Devine portrait

Sibyll Devine

Role: Protected Psychic damage, Infiltrate utility, and armored-target pressure.

Protect Sibyll instead of trying to make her a tank.

Rank
Normal Silver I rank Elite Gold I rank
Active
Normal17+ Elite26+
Passive
Normal17+ Elite26+
Weapon
Normal 1 Elite 1
Defense
Normal 5 Elite 1

Sibyll's Psychic damage is valuable into Chaos Terminators and other armored enemies, while her adjacency utility can let a key ally begin the turn with Infiltrate and cross a Havoc Overwatch lane safely.

Keep her on a protected lateral or rear hex. Bloodletters gain additional pressure into Psykers, and an underbuilt Sibyll should never be the character used to test an Overwatch lane.

On trio-only stages, preserve her first and use Kut's position to control contact. Her utility matters most when she survives long enough to shape several turns.

Supporting Heroes

Supporting heroes dramatically reduce the difficulty of open-deployment stages, but they do not replace Kut, Sibyll, and Thaddeus on restricted Elite battles.

Best

Campaign Comrades
Sergeant Bellator portrait

Bellator

Role: Durable frontline support, multi-hit attacker, and summon engine.

Use Bellator and his Inceptors to make the battlefield crowded in your favor.

Bellator reinforces Kut on the frontline and uses Inceptors to add bodies between Chaos enemies and the backline. Those summons can occupy attack hexes, redirect movement, and absorb a Bloodletter charge or Terminator attack.

He is also a strong account-wide Imperial investment, so campaign resources spent on him continue paying off elsewhere.

Brother Raimund Burchard portrait

Brother Burchard

Role: Durable frontliner, body-blocker, and close-range area damage.

Burchard turns one frontline anchor into two.

Burchard can reinforce Kut, close lanes into the backline, and punish enemies packed around the frontline with Blast damage.

Choose him when one anchor is not enough and the map allows a second durable body to form a genuine wall in front of Thaddeus and Sibyll.

Battle Sister Vindicta portrait

Vindicta

Role: Accessible area damage and clustered-enemy clearing.

Let Kut gather the problem; let Vindicta burn the problem.

Vindicta punishes Traitor Guardsmen and Bloodletters that bunch around Kut. She is especially attractive early because many accounts already have her.

Plan her Flame hexes carefully: burning terrain can interfere with the compact formation Isabella, Kut, and Sibyll want to maintain.

Elite Heroes
Kariyan Helsates portrait

Kariyan

Role: High-investment carry and durable frontline support.

Bring the monster you already built; do not build the monster just for Cadia.

A heavily developed Kariyan can take dangerous forward positions and compensate for weaker required heroes wherever supports are permitted.

His best use is bringing an existing high-end investment into Cadia, not starting a campaign-specific build.

Marneus Calgar portrait

Marneus Calgar

Role: Premium frontline wall, area damage, and ally support.

Calgar gives Thaddeus room to shoot by making the frontline exceptionally hard to break.

Calgar fits beside Kut on the dangerous edge of the formation. Their two durable bodies keep Bloodletters and Terminators away from Sibyll and Thaddeus while Calgar contributes meaningful damage.

Lucien portrait

Lucien

Role: Mobile damage carry and rapid threat removal.

Solve incoming damage by deleting its source.

Lucien protects the formation by removing dangerous enemies before they act. His mobility is an aggressive answer to an exposed Havoc or backline threat.

He does not heal or resurrect the required trio, so his offense must become defense.

Mataneo portrait

Mataneo

Role: Mobility, temporary bodies, and enemy-targeting disruption.

Mataneo wins space, and space keeps the required trio alive.

Mataneo reaches priority targets while his additional bodies block routes and change enemy targeting. A well-placed body can absorb a Bloodletter charge, disrupt a Terminator route, or preserve Isabella's healing formation.

Lord Marshal Varnan Dreir portrait

Lord Marshal Varnan Dreir

Role: Durable charging frontliner and self-sustaining pressure.

Dreir protects the backline by moving the fight somewhere else.

Dreir pushes the fight away from vulnerable characters. His charge pressure and self-sustain reduce the number of attacks that reach the Astra Militarum backline.

He cannot replace Isabella's healing, but he can prevent damage through pressure, positioning, and durability.

Difficult Stages

Deployment restrictions define the most important Fall of Cadia Mirror gates. Replay ranks vary widely, so use low-investment clears as proof of possibility—not as a universal beginner baseline.

Normal
63

Normal 63 — Required-Trio Check

Why players struggle

A late required-trio-only deployment exposes weak mandatory heroes and removes Isabella's safety net.

Strategy

  • Build the formation around Kut's screen and Thaddeus's firing lane.
  • Keep Sibyll out of direct Bloodletter routes.
  • Preserve Basilisk Barrage for the enemy that opens the backline.
  • Clear first and return for the third medal after focused upgrades.

Closing note

This is the Normal reminder that supports make the campaign easier but cannot replace the required trio.

75

Normal 75 — Abaddon

Why players struggle

The final Normal boss combines Terminator durability, surrounding Chaos pressure, and a full-team survival requirement.

Strategy

  • Control the approach before collapsing on Abaddon.
  • Keep Thaddeus behind Kut with a clear line to priority threats.
  • Use Isabella when permitted to preserve the three-medal margin.
  • Avoid leaving Sibyll exposed during the final cleanup.

Closing note

Win the formation battle first; the boss is safer once the routes into the backline are closed.

Elite
2

Elite 2 — First Trio-Only Test

Why players struggle

The first Elite restriction immediately removes healers and premium carries.

Strategy

  • Let Kut own the contact hex.
  • Keep Thaddeus stationary until the Barrage decision is made.
  • Use Sibyll's adjacency utility without exposing her.
  • Treat the stage as a formation test rather than inferring a minimum rank from one replay.

Closing note

This stage asks whether the trio functions without Isabella, not whether your support roster is strong.

12

Elite 12 — Trio-Only Formation Check

Why players struggle

Another support-free map tests the same compact formation at a higher enemy threshold.

Strategy

  • Inspect Overwatch lanes before moving.
  • Preserve Kut's health by controlling who can contact him.
  • Keep Sibyll protected and let Thaddeus solve the damage bottleneck.
  • Do not invent a special rank threshold from the current evidence gap.

Closing note

Use the trio principles consistently: Kut screens, Thaddeus carries, Sibyll stays protected.

No dedicated replay row is available for this stage yet. Use the campaign filters and the trio formation principles above.

29

Elite 29 — Late Trio-Only Gate

Why players struggle

The late restriction exposes weak required characters, while replay ranks vary too widely to define one universal minimum.

Strategy

  • Do not plan around Isabella; she cannot deploy.
  • Move the best defensive gear to the hero who dies first.
  • Use Kut to deny the cleanest route into Thaddeus or Sibyll.
  • Treat extremely low-rank clears as proof of possibility, not a beginner baseline.

Closing note

Positioning and concentrated investment matter more than equal ranks across the trio.

36

Elite 36 — Final Trio-Only Gate

Why players struggle

This is the best-calibrated required-trio check and one of the campaign's most important investment tests.

Strategy

  • Use Silver-range Kut and Sibyll as protected utility while Gold-range Thaddeus supplies the damage.
  • Solve Havoc Overwatch before moving a vulnerable hero.
  • Restart an opening that creates an unrecoverable backline breach.
  • Add durability only where the actual death occurs.

Closing note

The most transferable clears build around Thaddeus rather than promoting the trio equally.

39

Elite 39 — Penultimate Support Stage

Why players struggle

Supports return, but late-Elite damage and positioning still punish a fragile formation.

Strategy

  • Start with Isabella when available.
  • Add a durable body or mobile threat remover that already serves the wider account.
  • Keep the likely casualty adjacent to Isabella.
  • Treat optimized low-rank clears as demonstrations, not universal targets.

Closing note

Isabella adds enormous leverage here, but she still needs a formation that prevents clean one-shots.

40

Elite 40 — Abaddon

Why players struggle

The final battle combines a durable boss with Elite enemy pressure while every required hero must survive.

Strategy

  • Use Kut and a durable support to hold the dangerous edge.
  • Let Thaddeus Suppress or remove the highest-priority ranged threat.
  • Keep Isabella adjacent to the likely casualty when she is available.
  • Collapse on Abaddon only after the backline is safe.

Closing note

Gold I across the trio is more than enough with good supports; focused Thaddeus investment can substitute for excess Sibyll investment.

Bosses

Fall of Cadia Mirror bosses appear at Normal 15, 30, 45, 60, and 75, with their Elite encounters at 8, 16, 24, 32, and 40.

Drakfus Angrax portrait

Angrax

Normal 15Elite 8

Keep Sibyll out of his contact route and let Kut absorb the approach.

Use ranged pressure from behind the screen and avoid surrounding him with vulnerable heroes.

Master Archimatos portrait

Archimatos

Normal 30Elite 16

Burst Archimatos before Bloodletter pressure compounds.

Protect Sibyll from the summons and deny open adjacent hexes when possible.

Volk, Reforged by the Warp portrait

Volk

Normal 45Elite 24

Modern Volk is much bulkier than older guides suggest and benefits from Heavy Weapon.

Thaddeus's range and Suppression are especially useful while Kut controls the frontline.

Haarken Worldclaimer portrait

Haarken Worldclaimer

Normal 60Elite 32

Screen his mobile approach and avoid offering Sibyll as an easy finishing target.

Focus damage once he commits so his pressure cannot build through repeated kills.

Abaddon the Despoiler portrait

Abaddon the Despoiler

Normal 75Elite 40

Control the surrounding threats and approach lanes before committing to the boss.

Use Isabella's compact healing formation where permitted and keep Thaddeus firing safely from behind Kut.

Campaign Replay Filters

Stuck on a specific stage? Select the difficulty and stage number to compare team compositions, hero ranks, and successful strategies.

Every recommendation on this page is supported by campaign research, documented clears, or the Terminus Maximus Campaign Replay Library. Use the filters below to find successful Fall of Cadia Mirror runs for any available Normal or Elite stage.

Compare teams carefully. A low-rank clear may depend on stronger equipment, Isabella, a heavily developed carry, favorable enemy movement, or exact turn-by-turn positioning. The most useful replay is the one whose roster and investment most closely resemble your own.

More Filters

Campaign Replays

Normal 60 3 replays Isabella MarikenSergeant CertusSergeant BellatorCommissar Sebastian Yarrick
Normal 61 4 replays Isabella MarikenSergeant CertusSergeant BellatorCommissar Sebastian Yarrick
Normal 62 2 replays Isabella Mariken
Normal 63 1 replay
Normal 64 3 replays Isabella MarikenSergeant BellatorCommissar Sebastian Yarrick
Normal 65 2 replays Commissar Sebastian YarrickIsabella MarikenSergeant Bellator
Normal 66 2 replays Isabella MarikenCommissar Sebastian Yarrick
Normal 67 3 replays Isabella MarikenSergeant BellatorCommissar Sebastian Yarrick
Normal 68 3 replays Sergeant BellatorIsabella MarikenCommissar Sebastian Yarrick
Normal 69 2 replays Isabella Mariken
Normal 70 3 replays Isabella MarikenSergeant BellatorCommissar Sebastian Yarrick
Normal 71 2 replays Isabella MarikenSergeant BellatorCommissar Sebastian Yarrick
Normal 72 2 replays Isabella MarikenSergeant BellatorCommissar Sebastian Yarrick
Normal 73 2 replays Isabella MarikenCommissar Sebastian Yarrick
Normal 74 1 replay Isabella MarikenSergeant Bellator
Normal 75 1 replay Isabella MarikenSergeant Bellator
Elite 1 1 replay Isabella Mariken
Elite 2 1 replay
Elite 3 1 replay Isabella Mariken
Elite 4 1 replay Isabella MarikenSergeant Bellator
Elite 7 1 replay Isabella MarikenDemetrian Titus
Elite 8 1 replay Isabella MarikenSergeant Bellator
Elite 9 1 replay Isabella Mariken
Elite 10 1 replay Isabella MarikenSergeant Bellator
Elite 11 1 replay Isabella MarikenSergeant Bellator
Elite 14 1 replay Isabella Mariken
Elite 15 1 replay Isabella MarikenCommissar Sebastian Yarrick
Elite 16 1 replay Isabella MarikenCommissar Sebastian Yarrick
Elite 17 1 replay Isabella MarikenCommissar Sebastian Yarrick

Elite 18 1 replay Isabella Mariken
Elite 19 1 replay Isabella MarikenDemetrian Titus
Elite 20 1 replay Isabella MarikenDemetrian Titus
Elite 21 1 replay Isabella Mariken
Elite 22 1 replay Isabella MarikenDemetrian Titus
Elite 23 1 replay Isabella MarikenDemetrian Titus
Elite 25 1 replay Isabella MarikenDemetrian Titus
Elite 26 1 replay Isabella Mariken
Elite 27 1 replay Isabella MarikenDemetrian Titus

Elite 28 1 replay Isabella Mariken
Elite 29 2 replays
Elite 36 4 replays
Elite 39 1 replay Battle Sister VindictaIsabella Mariken
Elite 40 2 replays Isabella MarikenSergeant BellatorTyrith Shiva Kyrus

Campaign Replay Statistics

These ranks change as you apply Filters

Kut Skoden portrait
KutElite: 27 stagesNormal: 16 stages
Max Rank
Diamond III rank badge
Diamond III
Sibyll Devine portrait
SibyllElite: 27 stagesNormal: 16 stages
Max Rank
Gold II rank badge
Gold II
Thaddeus Noble portrait
ThadElite: 27 stagesNormal: 16 stages
Max Rank
Diamond I rank badge
Diamond I
Isabella Mariken portrait
IsaElite: 24 stagesNormal: 15 stages
Max Rank
Gold II rank badge
Gold II
Sergeant Bellator portrait
BellaElite: 5 stagesNormal: 11 stages
Max Rank
Gold III rank badge
Gold III
Commissar Sebastian Yarrick portrait
YarrickElite: 3 stagesNormal: 11 stages
Max Rank
Gold II rank badge
Gold II
Demetrian Titus portrait
TitusElite: 7 stagesNormal: 0 stages
Max Rank
Gold I rank badge
Gold I
Sergeant Certus portrait
CertusElite: 0 stagesNormal: 2 stages
Max Rank
Bronze II rank badge
Bronze II
Tyrith Shiva Kyrus portrait
TyrithElite: 1 stageNormal: 0 stages
Max Rank
Gold I rank badge
Gold I
Battle Sister Vindicta portrait
VindiElite: 1 stageNormal: 0 stages
Max Rank
Iron I rank badge
Iron I