← All Campaign Guides

Tacticus Saim-Hann Mirror Campaign Guide

Beat every Saim-Hann Mirror Normal and Elite stage with recommended Chaos teams, investment targets, and replay-backed strategies.

Replay data updated:

Overview

Timing

Complete Normal for efficient Mirror farming. Push Elite to useful nodes, but do not over-invest until you truly need to progress.

Unlock and three-medal Normal in the early-to-mid game once Yazaghor, Abraxas, and Toth are available. Mirror nodes are already efficient farms, so Normal completion has value even if Elite is not yet realistic.

Progress Elite while existing Chaos supports can carry unrestricted stages. Stop when the next required-trio gate demands disproportionate Toth or Yazaghor investment, then return as Abraxas and the wider Chaos roster grow naturally.

Elite becomes most valuable for rare and legendary materials, character shards, and a wider selection of efficient farms. Full completion is a mid-to-late-game efficiency project rather than an urgent early-account requirement.


Progression

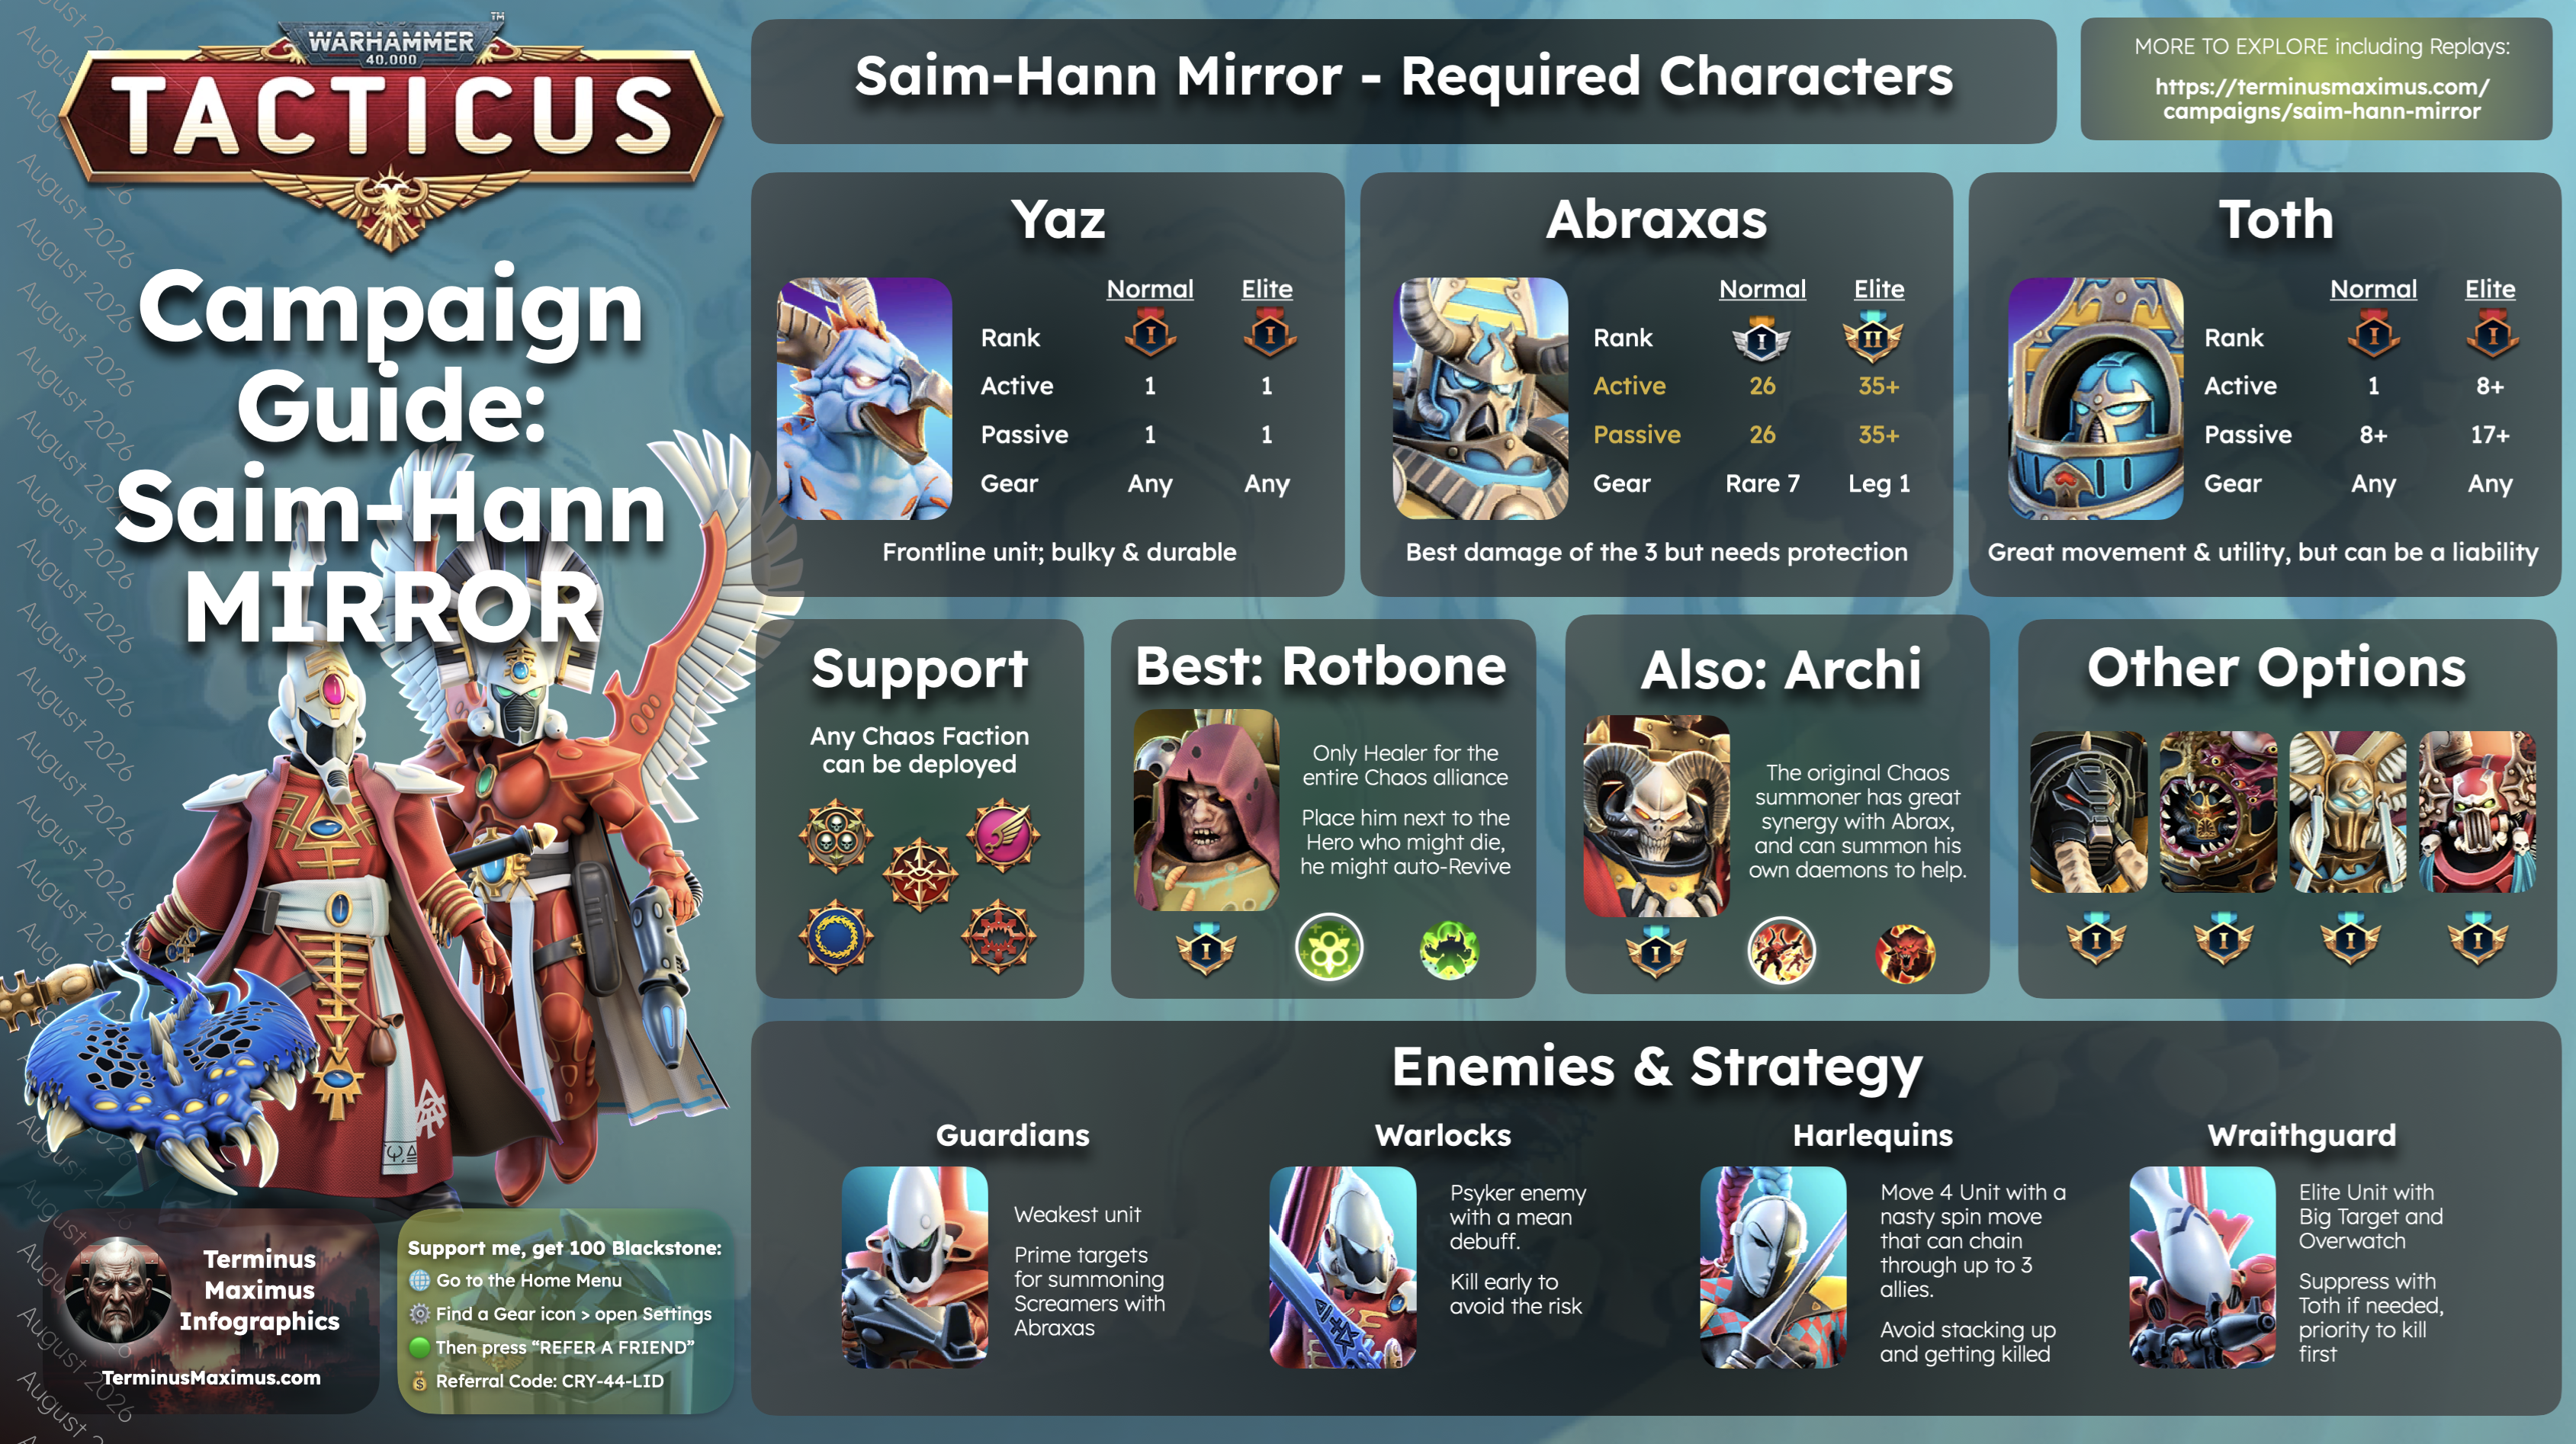
Required Carry: Abraxas. Investment priority: Abraxas first, Toth second, and Yazaghor only as high as restricted-stage survival demands.

Treat Saim-Hann Mirror as an Abraxas campaign on restricted stages and a shared Chaos campaign everywhere else.

  1. Unlock Yazaghor, Abraxas, and Toth through Saim-Hann progression.
  2. Build Abraxas first, especially Malefic Maelstrom, then add only enough Toth and Yazaghor durability to preserve medals.
  3. Complete Normal and collect all 225 medals to unlock Elite.
  4. Use Rotbone for survival and Archimatos for psychic summon pressure on unrestricted stages.
  5. Test Elite 1–2, 11, 17, and 28 as required-trio investment checks.
  6. Prepare Abraxas's summon geometry and Yazaghor swap sequence for the final trio-only gate at Elite 38.
  7. After Elite 38, bring the strongest justified Chaos supports to Elite 39–40.
  8. Pursue full completion only when the farming nodes or Maugan Ra shards justify the cost.

Recommended Investment targets are practical planning goals, not universal minimums. Replay clears vary with ability levels, equipment, summon placement, enemy movement, and exact turn order.

The most efficient cross-campaign core is Abraxas, Archimatos, and Rotbone. Archimatos overlaps directly with Fall of Cadia, while Rotbone protects underbuilt required heroes wherever support slots are open.

Recommended Investment

Normal Investment

HeroRankActivePassiveWeaponDefense
Yazaghor Ficklefate Bronze I rank Yaz active ability1 Yaz passive ability1 1 1
Arkarzar Abraxas Silver I rank Abrax active ability26 Abrax passive ability26 1 7
Sokar Toth Bronze I rank Toth active ability8+ Toth passive ability17 1 1

Elite Investment

HeroRankActivePassiveWeaponDefense
Yazaghor Ficklefate Bronze I rank Yaz active ability1 Yaz passive ability1 1 1
Arkarzar Abraxas Gold II rank Abrax active ability35+ Abrax passive ability35+ 1 1
Sokar Toth Bronze I rank Toth active ability8+ Toth passive ability17 1 1

Strategy & Tips

Reserve Summon Hexes

Position Abraxas where several adjacent hexes are open and new Screamers can immediately attack. A crowded starting position can waste most of Malefic Maelstrom's value.

Sequence Psychic Damage

Activate Malefic Maelstrom before the turn's useful Psychic attacks. Let Abraxas, Yazaghor, Archimatos, or Ahriman trigger Screamers while the effect remains active.

Preserve the Yazaghor Swap

Keep an enemy in Yazaghor's range and do not spend Sorcerous Facade too early. Swapping Abraxas into a second open area can create another cluster of summons in the same turn.

Let Toth Hold the Line

Use Toth's durability, Suppressive Fire, and Time Flux to protect Yazaghor and Abraxas. His passive is the important medal-preservation investment when restricted stages become lethal.

Control Wraithguard

Suppress Elite Wraithguard with Toth or Volk to remove Overwatch, or engage them with an expendable summon. Avoid lining required heroes up for Wraithcannon splash.

Remove the Warlock System

Warlocks improve nearby Aeldari survival and accuracy. Prioritize them when their support is making Guardians or other threats harder to remove.

Sacrifice the Summons

Summons are successful when they absorb attacks or block dangerous routes. Keep Rotbone adjacent to the required hero most likely to die on open-deployment stages.

Required Heroes

Yazaghor, Abraxas, and Toth are mandatory throughout Saim-Hann Mirror. Elite 1–2, 11, 17, 28, and 38 restrict deployment to this trio, so optional Chaos heroes cannot eliminate their survival requirements.

Yazaghor Ficklefate portrait

Yazaghor

Role: Mobile psychic enabler, Abraxas repositioner, and required-trio survivor.

Keep Yazaghor cheap, mobile, and alive; preserve Sorcerous Facade until it can relocate Abraxas safely.

Rank
Normal Bronze I rank Elite Bronze I rank
Active
Normal1 Elite1
Passive
Normal1 Elite1
Weapon
Normal 1 Elite 1
Defense
Normal 1 Elite 1

Yazaghor's four movement and Flying let him reach the square that unlocks the campaign's signature combo. Sorcerous Facade attacks and then swaps him with a friendly Psyker, allowing Abraxas to continue Malefic Maelstrom from a second cluster of open hexes.

The swap works without heavy ability investment, so Yazaghor is the best candidate for deliberate under-investment. Raise him when a required-trio stage proves that he cannot reach the needed position and survive.

Reality Unbound is secondary for campaign progression. Prioritize defensive equipment and careful post-swap placement before adding badges or an entire rank solely for more damage.

Sokar Toth portrait

Toth

Role: Terminator tank, ranged suppressor, and self-reviving survival piece.

Build Toth as the immovable survival piece that keeps pressure away from Yazaghor and Abraxas.

Rank
Normal Bronze I rank Elite Bronze I rank
Active
Normal8+ Elite8+
Passive
Normal17 Elite17
Weapon
Normal 1 Elite 1
Defense
Normal 1 Elite 1

Toth is the trio's natural front line. Terminator Armour blunts an opening hit, Suppressive Fire helps control Wraithguard Overwatch, and Time Flux can heal or revive him from his time ghost.

Use Hellfyre Missile Rack after Psychic damage has marked useful targets. For low-investment medal clears, however, Time Flux and defensive equipment matter more because Toth's job is to survive while Abraxas and the summons clear the map.

Raise Toth when restricted stages outgrow his durability. On unrestricted stages, Rotbone, summons, and stronger Chaos frontliners can reduce the need for campaign-only investment.

Supporting Heroes

Use Rotbone for three-medal survival and Archimatos for accessible psychic summon pressure. Both are fully displayed because they form the strongest general-purpose pair for unrestricted stages.

Best

Also Good

Other Options
Drakfus Angrax portrait

Angrax

Role: Durable Fall of Cadia crossover and route-blocking tank.

A high-efficiency crossover tank when the map needs a durable body.

Angrax supplies the raw durability that the required trio lacks. Deep Strike, Terminator Armour, and his reaction attacks let him occupy a dangerous approach while Abraxas prepares the summon turn.

He is mandatory for Fall of Cadia, so use an existing build whenever a map needs another frontliner. He protects less directly than Rotbone and contributes less to the psychic engine than Archimatos.

Volk, Reforged by the Warp portrait

Volk

Role: Ranged control, Suppressive Fire, and Wraithguard counter.

The specialist ranged-control option for Wraithguard-heavy Elite maps.

Volk's reworked durability, range-three attack, Heavy Weapon, and Suppressive Fire make older glass-cannon advice obsolete. Suppression removes Overwatch, giving him a specific job against Elite Wraithguard.

Use him when ranged control is the failure point and he already fits the wider roster. Rotbone and Archimatos remain the more general campaign choices.

Ahzek Ahriman portrait

Ahriman

Role: Luxury psychic damage and Psychic/Flame amplification.

Powerful psychic synergy for an established roster, not an efficiency-first unlock.

Ahriman has excellent direct synergy with Abraxas: he supplies Psychic attacks, mobile damage, and amplification for Psychic and Flame-heavy turns.

His Legendary acquisition and investment cost make him a luxury solution. Use an already-developed Ahriman, but do not build him solely to replace the accessible Archimatos option.

Kh√¢rn the Betrayer portrait

Khârn

Role: Premium melee damage and priority-target deletion.

Exceptional damage when already built; unnecessary as a campaign-specific investment.

Khârn can remove dangerous Aeldari quickly on unrestricted stages, but he does not heal, shield, summon, or add Psychic triggers to the Abraxas engine.

Bring an existing high-rank Khârn when raw damage solves the map. Campaign progress alone does not justify his cost, and he cannot help at Elite 38.

Difficult Stages

Deployment restrictions define the campaign's true investment floor. Replay ranks vary widely, so treat low-investment clears as proof of possibility rather than a repeatable baseline.

Normal
67

Normal 67 — Final Required-Trio Gate

Why players struggle

The last Normal trio-only restriction removes Rotbone and Archimatos, exposing any required hero that has been carried through open stages.

Strategy

  • Open enough hexes for Abraxas before using Malefic Maelstrom.
  • Preserve an enemy in Yazaghor's range for Sorcerous Facade.
  • Use Toth to cover the most dangerous approach.
  • Hide the weakest required hero once summons control the board.

Closing note

Use this stage—not a support-carried boss fight—to judge whether the Normal trio is durable enough.

75

Normal 75 — Maugan Ra

Why players struggle

The Normal finale restores support slots, but the boss and surrounding Aeldari can still remove an exposed required hero and cost the final medal.

Strategy

  • Bring Rotbone for survival or Archimatos for offensive summon pressure.
  • Remove Warlock support before committing to Maugan Ra.
  • Use summons to absorb attacks and restrict Battle Focus movement.
  • Protect the lowest-rank required hero during cleanup.

Closing note

Complete Normal for Maugan Ra shard access and the efficient Mirror farming map; do not overbuild the trio for this open-deployment fight.

Elite
11

Elite 11 — Required Trio Returns

Why players struggle

Support slots disappear after early Elite stages have encouraged reliance on the wider Chaos roster.

Strategy

  • Recheck equipment on Yazaghor and Toth before adding a full rank.
  • Build the turn around Abraxas's open summon hexes.
  • Let Toth absorb the first qualifying attack.
  • Preserve Sorcerous Facade until it creates a safer second summon position.

Closing note

This is the first reminder that optional Chaos heroes cannot set the final investment floor.

17
Elite 17 — Mid-Elite Trio Check

Why players struggle

A second restricted wall tests whether Abraxas's summon quality and the other two heroes' survival have kept pace with Elite damage.

Strategy

  • Use one Doom-style focus target rather than spreading Psychic damage without purpose.
  • Keep Yazaghor out of the easiest direct attack route after the swap.
  • Use Toth's suppression on an Overwatch threat when available.
  • Treat every enemy attack redirected into a summon as successful medal protection.

Closing note

Raise Abraxas first; add Toth or Yazaghor investment only when survival is the actual failure.

28

Elite 28 — Late Required-Trio Wall

Why players struggle

Elite 28 is the last restricted checkpoint before the final chapter and exposes support-heavy rosters that have postponed the required trio.

Strategy

  • Enter with strong defensive equipment on the hero the AI targets first.
  • Do not crowd Abraxas before Malefic Maelstrom.
  • Save Yazaghor's swap until the second position has useful adjacent spaces.
  • Avoid lining heroes up for Wraithcannon splash.

Closing note

Clearing 28 is a better readiness signal for Elite 38 than success on an unrestricted stage.

38

Elite 38 — The Required-Core Benchmark

Why players struggle

Elite 38 allows only Yazaghor, Abraxas, and Toth. Rotbone, Archimatos, Volk, and every other modern support shortcut disappear against a seven-enemy fight.

Strategy

  • Maximize usable adjacent hexes before activating Malefic Maelstrom.
  • Keep an enemy in Yazaghor's range so Sorcerous Facade remains available.
  • Use the swap to move Abraxas into a second open summon cluster.
  • Let Toth cover the line most dangerous to Yazaghor and suppress Overwatch where possible.
  • Avoid exposing the trio in lines that amplify Wraithcannon damage.

Closing note

No exact universal active-level breakpoint is proven. Higher Malefic Maelstrom levels steadily improve summon survival and damage; execution and equipment still matter.

40

Elite 40 — Maugan Ra

Why players struggle

Support slots return for the final boss, turning the finale back into a broader Chaos roster test after Elite 38 established the required-trio floor.

Strategy

  • Bring Rotbone for medal reliability and Archimatos when additional psychic summons solve the opening.
  • Use Volk if Wraithguard Overwatch is the central problem.
  • Focus the Warlock-supported threat system before collapsing on Maugan Ra.
  • Move damaged required heroes out of danger during cleanup.

Closing note

Elite 40 justifies broader account investments; it should not be used to overstate what Toth or Yazaghor needed at Elite 38.

Bosses

Saim-Hann Mirror bosses appear at Normal 15, 30, 45, 60, and 75, with their Elite encounters at 8, 16, 24, 32, and 40.

Calandis Tawaren portrait

Calandis

Normal 15Elite 8

Control Calandis's long firing lane with summons and terrain before exposing Yazaghor.

Use Toth to absorb the dangerous opening and collapse once her escape space is restricted.

Aethana Barantharal portrait

Aethana

Normal 30Elite 16

Aethana's mobility can reach fragile required heroes and strengthen nearby Aeldari.

Screen her approach with summons and avoid swapping Yazaghor into an unsupported kill route.

Eldryon Ynaduin portrait

Eldryon

Normal 45Elite 24

Eldryon's Psychic damage and amplification reward removing nearby attackers before they can focus a required hero.

Use summon bodies to disrupt the formation, then commit to Eldryon once the most dangerous attack lanes are controlled.

Jain Zar portrait

Jain Zar

Normal 60Elite 32

Jain Zar crosses Overwatch safely and punishes exposed clusters at close range.

Spread the required heroes, screen her with summons, and use Rotbone adjacency when support slots are available.

Maugan Ra portrait

Maugan Ra

Normal 75Elite 40

Maugan Ra is an open-deployment boss, so use the strongest justified Chaos support roster rather than adding unnecessary required-hero ranks.

Control Wraithguard and Warlock support first, then focus the boss while damaged required heroes withdraw from the easiest firing lanes.

Campaign Replay Filters

Stuck on a specific stage? Select the difficulty and stage number to compare team compositions, hero ranks, and successful strategies.

Every recommendation on this page is supported by campaign research, documented clears, or the Terminus Maximus Campaign Replay Library. Use the filters below to find successful Saim-Hann Mirror runs for any available Normal or Elite stage.

Compare teams carefully. A low-rank clear may depend on stronger equipment, a highly developed Abraxas active, favorable summon geometry, enemy movement, or exact turn order. The most useful replay is the one whose roster and investment most closely resemble your own.

More Filters

Campaign Replays

Normal 60 2 replays Haarken WorldclaimerNauseous RotboneDrakfus AngraxMaster Archimatos
Normal 61 1 replay Drakfus AngraxMaster Archimatos
Normal 62 1 replay Drakfus AngraxMaster Archimatos
Normal 63 1 replay Drakfus Angrax
Normal 64 1 replay Drakfus Angrax
Normal 65 1 replay Drakfus AngraxVolk, Reforged by the Warp
Normal 66 1 replay Drakfus Angrax
Normal 67 1 replay

Normal 68 1 replay Drakfus AngraxKh√¢rn the Betrayer
Normal 69 1 replay Kh√¢rn the BetrayerCorrodius Achebile
Normal 70 1 replay Kh√¢rn the BetrayerCorrodius Achebile
Normal 71 1 replay Kh√¢rn the BetrayerCorrodius Achebile
Normal 72 1 replay Kh√¢rn the BetrayerCorrodius Achebile
Normal 73 1 replay Kh√¢rn the BetrayerDrakfus Angrax
Normal 74 1 replay Corrodius AchebileDrakfus Angrax
Normal 75 1 replay Drakfus AngraxMaster Archimatos
Elite 1 2 replays
Elite 2 1 replay
Elite 3 1 replay
Elite 4 1 replay
Elite 5 1 replay
Elite 6 1 replay
Elite 7 1 replay
Elite 8 1 replay
Elite 9 1 replay
Elite 10 1 replay
Elite 11 2 replays
Elite 12 1 replay
Elite 13 1 replay
Elite 14 1 replay
Elite 15 1 replay
Elite 16 1 replay
Elite 17 1 replay
Elite 18 1 replay
Elite 19 1 replay
Elite 20 1 replay
Elite 21 1 replay
Elite 22 1 replay
Elite 23 1 replay
Elite 24 1 replay
Elite 25 1 replay
Elite 26 1 replay
Elite 27 2 replays Wrask, the ButcherKh√¢rn the Betrayer
Elite 28 1 replay
Elite 29 1 replay
Elite 30 1 replay
Elite 31 1 replay
Elite 32 2 replays Kh√¢rn the BetrayerNauseous Rotbone
Elite 33 1 replay
Elite 34 1 replay
Elite 35 1 replay
Elite 36 1 replay
Elite 37 1 replay
Elite 38 4 replays
Elite 39 1 replay
Elite 40 2 replays Kh√¢rn the BetrayerMaster Archimatos

Campaign Replay Statistics

These ranks change as you apply Filters

Yazaghor Ficklefate portrait
YazElite: 40 stagesNormal: 16 stages
Max Rank
Gold II rank badge
Gold II
Arkarzar Abraxas portrait
AbraxElite: 40 stagesNormal: 16 stages
Max Rank
Diamond II rank badge
Diamond II
Sokar Toth portrait
TothElite: 40 stagesNormal: 16 stages
Max Rank
Gold I rank badge
Gold I
Drakfus Angrax portrait
AngraxElite: 0 stagesNormal: 11 stages
Max Rank
Silver III rank badge
Silver III
Kh√¢rn the Betrayer portrait
KharnElite: 3 stagesNormal: 6 stages
Max Rank
Gold I rank badge
Gold I
Master Archimatos portrait
ArchiElite: 1 stageNormal: 4 stages
Max Rank
Gold I rank badge
Gold I
Corrodius Achebile portrait
CorroElite: 0 stagesNormal: 5 stages
Max Rank
Bronze I rank badge
Bronze I
Nauseous Rotbone portrait
RotboneElite: 1 stageNormal: 1 stage
Max Rank
Gold I rank badge
Gold I
Haarken Worldclaimer portrait
HaarkenElite: 0 stagesNormal: 1 stage
Max Rank
Silver I rank badge
Silver I
Volk, Reforged by the Warp portrait
VolkElite: 0 stagesNormal: 1 stage
Max Rank
Gold I rank badge
Gold I
Wrask, the Butcher portrait
WraskElite: 1 stageNormal: 0 stages
Max Rank
Bronze III rank badge
Bronze III

More to Explore