← All Campaign Guides

Tacticus Indomitus Mirror Campaign Guide

Beat every Indomitus Mirror Normal and Elite stage with recommended Necron teams, investment targets, and replay-backed strategies.

Replay data updated:

Overview

Timing

Push for farming nodes first, clean up medals later, and build toward Elite when its next unlock is worth the investment.

Indomitus Mirror is one of the highest-value early campaigns because Mirror nodes generally offer better material drop rates than their Normal counterparts. Push it whenever the next group of nodes gives your account useful upgrades.

Progress as far as your current Necrons can comfortably take you, then return after account-wide upgrades. Opening a valuable farming node is usually more important than forcing three medals immediately.

All Normal medals eventually unlock Indomitus Mirror Elite, where the campaign adds excellent Elite material nodes and the long-term goal of farming Marneus Calgar shards.

Progression

Build Aleph-Null first. Scarabs, repairs, Living Metal, and strong survivability make Aleph the campaign centerpiece.

Treat Indomitus Mirror as a repeatable account-building loop.

  1. Advance until the next battle becomes expensive.
  2. Farm the newly opened Mirror upgrade nodes.
  3. Put the majority of early resources into Aleph-Null.
  4. Raise Imospekh and Makhotep enough to survive and contribute.
  5. Return for missing medals after the roster improves.
  6. Unlock Elite and test the opening stages immediately.
  7. Develop two optional Necrons for full-roster Elite battles.
  8. Push toward Elite materials and Marneus Calgar shard farming.

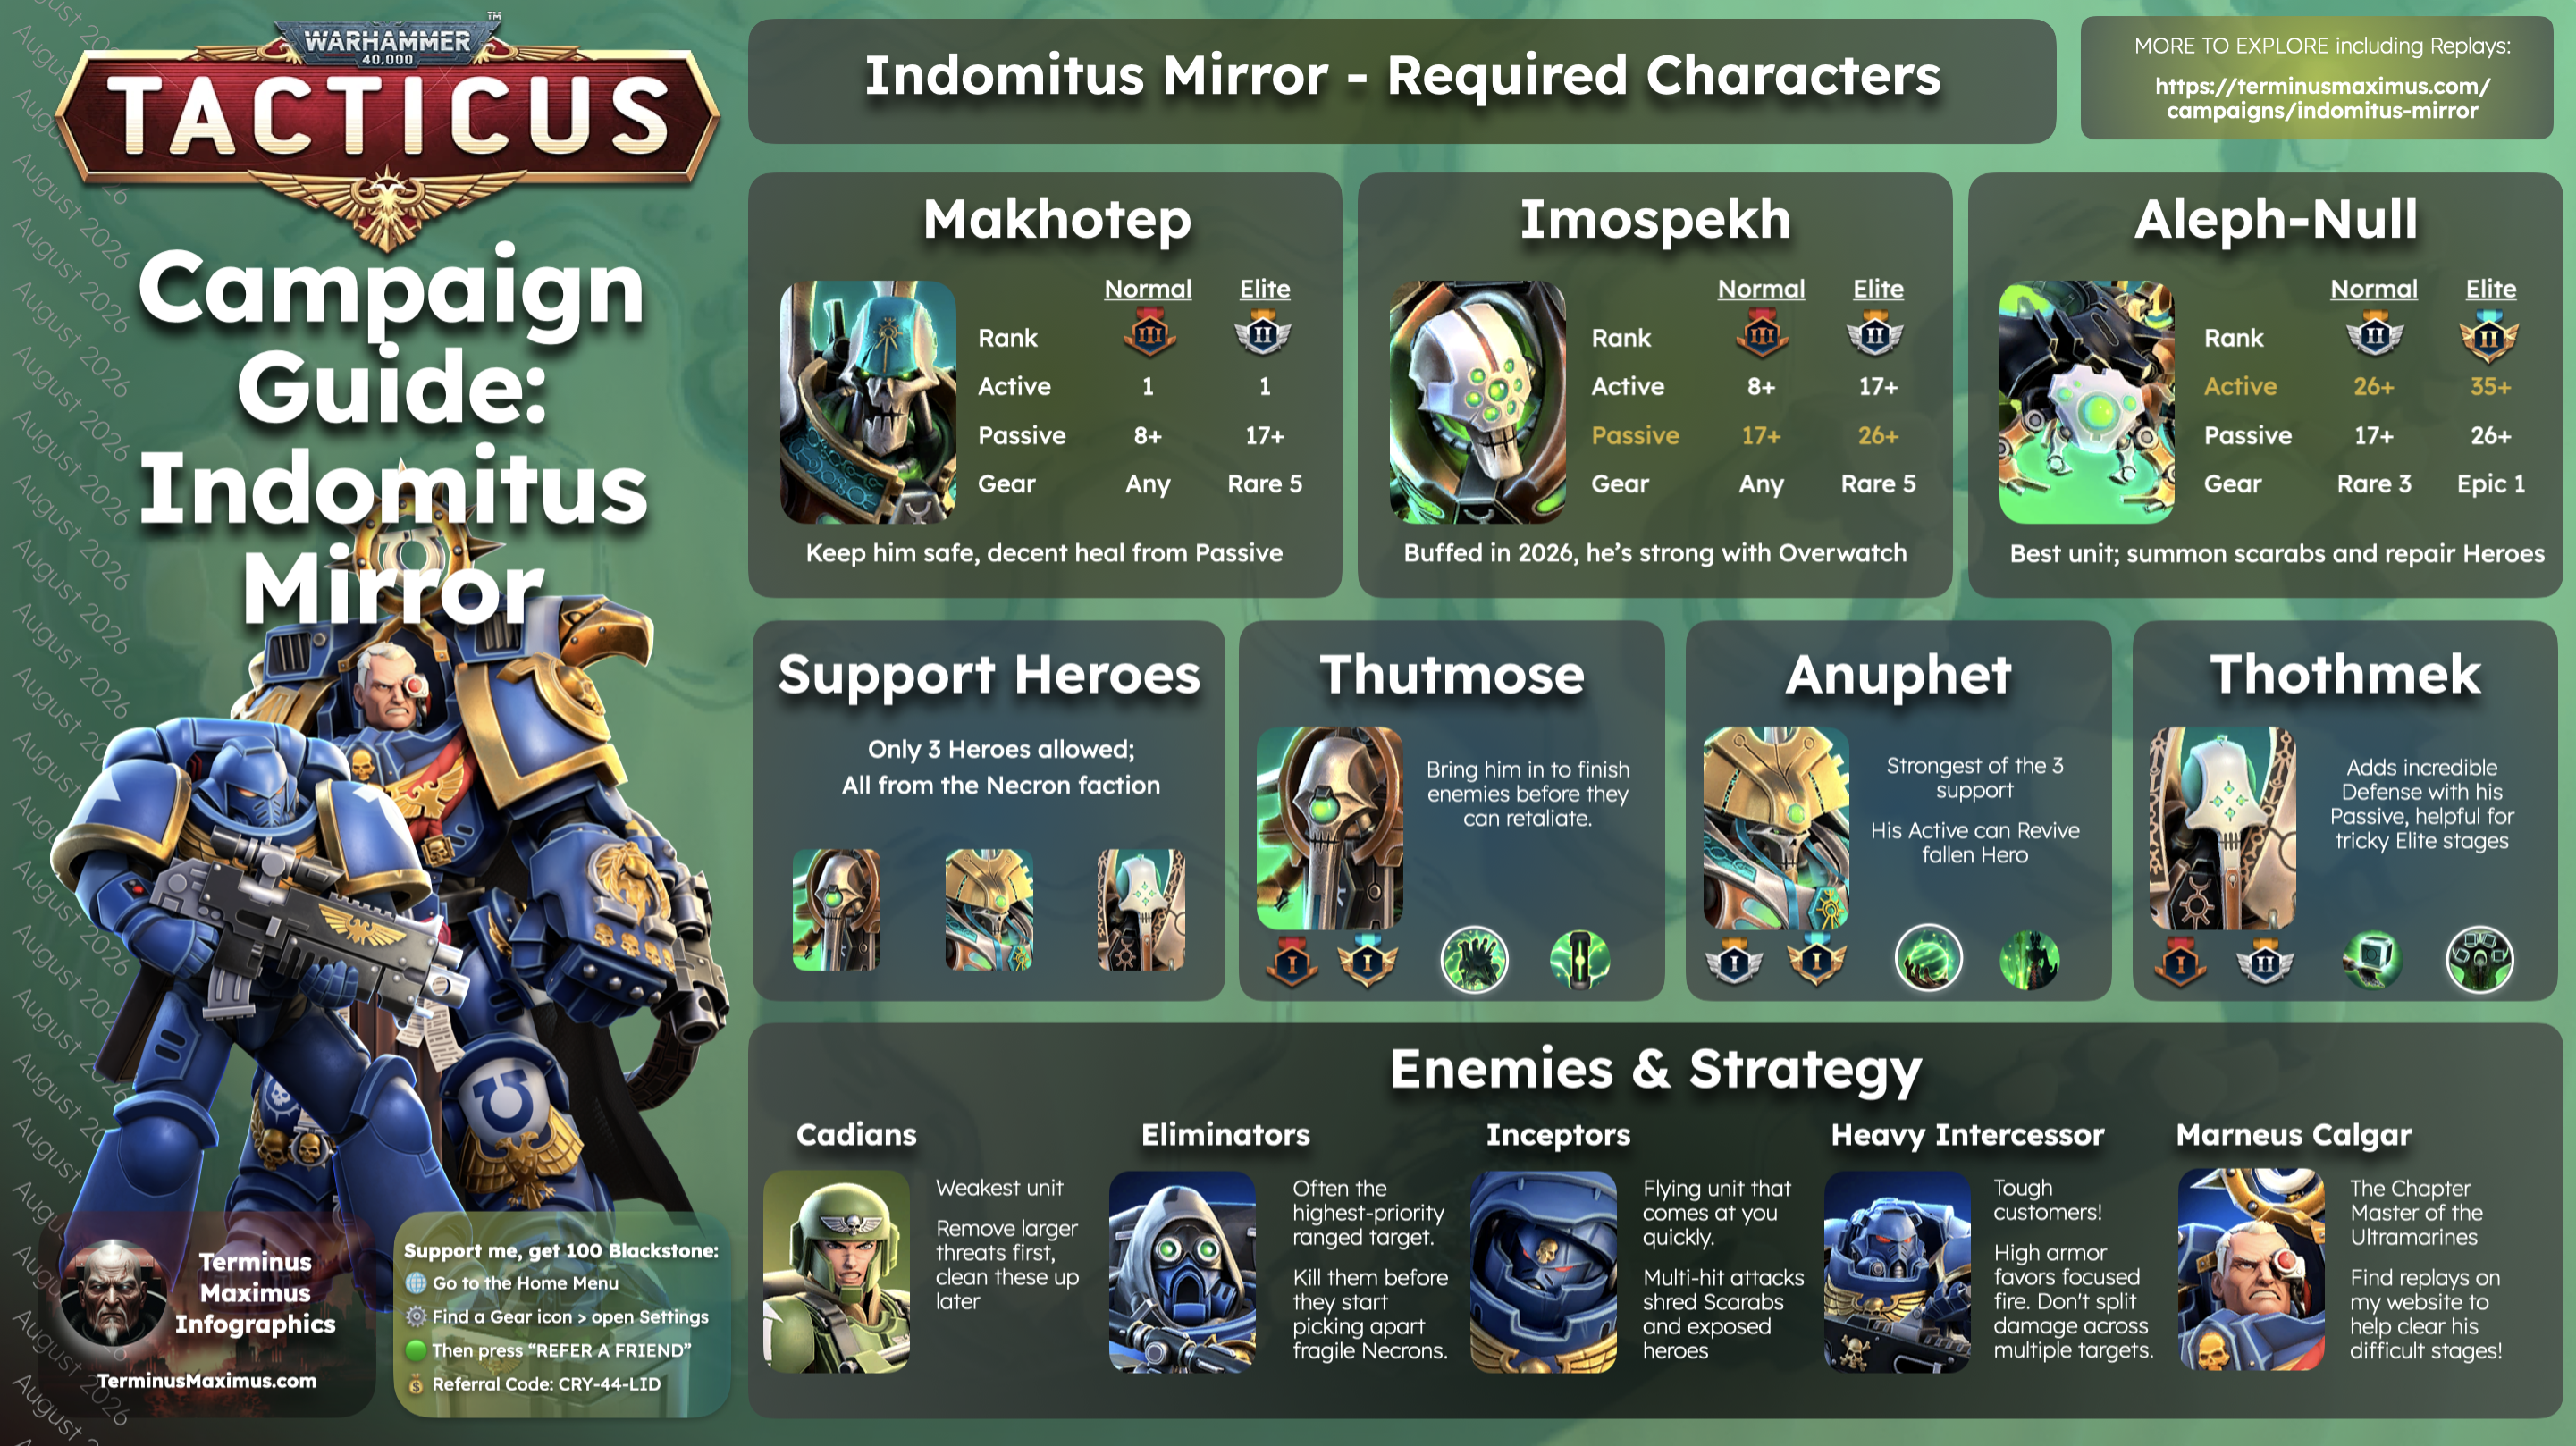
The campaign is Necron-restricted. Aleph-Null, Imospekh, and Makhotep are required, while Anuphet, Thothmek, and Thutmose can fill the remaining deployment slots when the map allows them.

Elite magnifies uneven investment. One strong carry can win the battle, but three medals still require every deployed Necron to survive burst turns and remain within repair range.

Recommended Investment

Normal Investment

HeroRankActivePassiveWeaponDefense
Royal Warden Makhotep Bronze III rank Makho active ability1 Makho passive ability8+ 1 1
Hexmark Destroyer Imospekh Bronze III rank Imo active ability8+ Imo passive ability17+ 1 1
Canoptek Spyder Aleph-Null Silver II rank Aleph active ability26 Aleph passive ability17+ 1 1

Elite Investment

HeroRankActivePassiveWeaponDefense
Royal Warden Makhotep Silver II rank Makho active ability1 Makho passive ability17+ 1 5
Hexmark Destroyer Imospekh Silver II rank Imo active ability17+ Imo passive ability26+ 1 5
Canoptek Spyder Aleph-Null Gold II rank Aleph active ability35+ Aleph passive ability26+ 1 1

Strategy & Tips

Upgrade Aleph-Null First

Aleph should receive the majority of early gear and ability investment. Scarabs absorb attacks, block routes, and preserve medals while Fabricator Claw Array repairs keep the formation intact.

Use Summons as Geometry

Scarabs and Necron Warriors do not need to survive to create value. Place them where they consume enemy attacks, block an approach, or protect a fragile required hero.

Stay Inside Repair Range

Keep a compact formation without clustering into area damage. Aleph-Null should be able to reach the forward unit, and Makhotep should remain close enough to support damaged Mechanical allies.

Claim High Ground, Then Set the Lane

When the map allows it, move Imospekh onto a safe High Ground hex one turn before enemies advance. The elevation boosts his Overwatch on the following turn; then use terrain and summons to force enemies through that stronger firing lane.

Invest in Survival

Defensive equipment belongs on the Necron that repeatedly dies first. Another damage upgrade rarely fixes a one-turn casualty or a missing third medal.

Focus One Threat

Finish one enemy instead of leaving several nearly dead. Prioritize anything that can bypass the front line, attack multiple times, heal, summon, or reach a fragile hero.

Return Later

A two-medal clear that opens a useful node is progress. Come back for difficult medals after new ranks, equipment, or optional heroes make the attempt cheaper.

Required Heroes

Makhotep, Imospekh, and Aleph-Null are required throughout Indomitus Mirror. Every recommendation below is loaded from the campaign recommendation JSON, so rank, ability, and equipment targets stay synchronized as those files change.

Royal Warden Makhotep portrait

Makhotep

Role: Repair support, movement utility, ranged chip damage, and summon tempo.

Support the formation and summons; do not try to turn Makhotep into the primary carry.

Rank
Normal Bronze III rank Elite Silver II rank
Active
Normal1 Elite1
Passive
Normal8+ Elite17+
Weapon
Normal 1 Elite 1
Defense
Normal 1 Elite 5

Makhotep is the required trio’s utility character. His movement support helps correct deployment, his range lets him contribute without abandoning the formation, and his passive repair improves the team’s staying power.

His active can give Scarabs or Necron Warriors another action, but it is most valuable when the extra movement or attack changes the board immediately. Do not spend it merely because it is available.

Keep Makhotep developed enough to survive, but avoid heavy investment while Aleph-Null still needs upgrades. In difficult Elite maps, strong defensive equipment often matters more than additional chip damage.

Hexmark Destroyer Imospekh portrait

Imospekh

Role: Ranged area denial, Overwatch control, and multi-target pressure.

Claim safe High Ground first, build the lane, then let the enemy enter it.

Rank
Normal Bronze III rank Elite Silver II rank
Active
Normal8+ Elite17+
Passive
Normal17+ Elite26+
Weapon
Normal 1 Elite 1
Defense
Normal 1 Elite 5

Imospekh is substantially stronger than older campaign advice suggests. A well-positioned Imospekh can remove several enemies through Overwatch before they reach the Necron formation.

Look one turn ahead for a safe High Ground hex. Moving Imospekh onto elevation before the enemy advances gives his next-turn Overwatch a valuable damage boost, especially when terrain, Scarabs, or Warriors funnel several targets through the same lane.

Once he is set, avoid abandoning the position for a marginal basic attack. Prioritize the passive before spending heavily on the active, and keep enough defensive investment on Imospekh that he can hold the elevated lane without becoming the enemy’s easiest target.

Supporting Heroes

Elite can open a full five-Necron roster, making Anuphet, Thothmek, and Thutmose substantially more valuable. All three are shown together because they form one clear class of optional Necron support.

Thothmek portrait

Thothmek

Role: Defensive support, Suppression, and adjacent Mechanical protection.

Best defensive support for consistent three-medal clears.

Thothmek is excellent for reliable three-medal clears. Suppression reduces enemy pressure, first-hit damage reduction blunts burst turns, and adjacent Mechanical protection helps keep the required trio intact.

Place Thothmek where the defensive effect covers the hero most likely to be attacked without creating an area-damage cluster. The value comes from making enemy turns predictable, not from chasing damage.

Thothmek pairs especially well with Aleph-Null and Anuphet when the map permits a full roster, giving the team multiple layers of sustain and board control.

Plasmancer Thutmose portrait

Thutmose

Role: Mobile burst damage and exposed-target removal.

A real offensive option—provided the formation can keep him protected.

Thutmose has become a legitimate damage dealer after recent balance improvements. His mobility and burst can remove an exposed priority target or finish clustered enemies before they retaliate.

He remains fragile. Keep him behind Aleph-Null, summons, or terrain until an attack secures a kill or materially changes the board. Incidental damage is rarely worth exposing him to concentrated fire.

Choose Thutmose when the roster needs offensive reach more than another layer of sustain. He is useful, but Anuphet and Thothmek are usually safer investments for difficult Elite medals.

Difficult Stages

The stages below generated the strongest concentration of community help requests, difficult replay searches, and “final missing medal” complaints. Difficulty is not determined by rank alone—deployment, equipment, target priority, and enemy behavior can be just as important.

Normal
30

Normal 30 — Formation Check

Why players struggle

The first major checkpoint punishes teams that expose several Necrons to the opening attack while Aleph-Null is too far away to repair them.

Strategy

  • Begin outside overlapping threat ranges unless advancing immediately removes a dangerous ranged attacker.
  • Keep Imospekh one hex behind the anchor and preserve a useful Overwatch lane.
  • Use Scarabs to block more than one approach or redirect multiple attacks.
  • Overload one side of the map instead of fighting the full enemy formation centrally.
  • Move defensive equipment to whichever required Necron dies first.

Closing note

A compact, repairable group that controls one approach is safer than a fast but dispersed attack.

45

Normal 45 — Controlled Attrition

Why players struggle

Enemy damage now exposes neglected health, armor, and defensive equipment. Early summons can also pull the team beyond repair range.

Strategy

  • Create a repairable triangle around Aleph-Null.
  • Let enemies enter Imospekh’s lane instead of exposing him centrally.
  • Use Scarabs as a lateral screen and focus one enemy at a time.
  • Delay Anuphet’s Warriors until they replace lost board control or surround an isolated threat.
  • Use Makhotep’s mobility support only when it corrects deployment or secures a kill.

Closing note

Reduce the number of enemy attacks each turn while keeping the formation inside repair range.

60

Normal 60 — Threat-Range Puzzle

Why players struggle

Exposed heroes may now be removed before healing matters. Reach, elevation, and attacks around the tank are more dangerous than the closest enemy.

Strategy

  • Identify every enemy that can reach a fragile Necron after one move.
  • Kill or obstruct long-reach attackers before slow durable blockers.
  • Occupy landing hexes and chokepoints with summons.
  • Maintain repair access without clustering into area damage.
  • Hold Thutmose until his attack secures a kill or seriously damages multiple targets.

Closing note

Deny the enemy with the best access to the back line before attacking the most convenient target.

74

Normal 74 — Ability Preservation

Why players struggle

The penultimate mission is often winnable but difficult to three-star after every active is spent in the opening exchange.

Strategy

  • Protect the least-developed required Necron during deployment.
  • Separate the fight into opening contact and final cleanup.
  • Move toward an edge or obstacle that prevents the anchor from being surrounded.
  • Repair before chasing unless the target can kill a hero next turn.
  • Re-form before the last kill instead of taking an aggressive shortcut.

Closing note

Winning one turn later with the full roster alive is better than a fast two-star clear.

75

Normal 75 — Marneus Calgar

Why players struggle

The final battle combines boss pressure with supporting enemies. Tunneling onto Calgar or ignoring him for too long can both collapse the formation.

Strategy

  • Decide whether Calgar can be isolated, blocked, or burst before choosing the first target.
  • Remove supports first when they add healing, multi-target damage, or back-line access.
  • Block Calgar’s approach with Scarabs or Warriors.
  • Keep the boss tank inside Aleph-Null’s repair path.
  • Hold a burst ability for the turn Calgar becomes exposed.

Closing note

Separate the battle into support clearance and a controlled boss exchange with repairs, blockers, and burst damage ready.

Elite
24

Elite 24 — Weak-Link Survival

Why players struggle

This widely reported progression wall exposes uneven investment: total damage is irrelevant when the weakest required Necron dies early.

Strategy

  • Make Aleph-Null or another durable unit the best opening target.
  • Avoid entering overlapping attack ranges on turn one.
  • Use Scarabs primarily to redirect attacks and restrict movement.
  • Cover an approach with Imospekh without exposing him to every ranged enemy.
  • Improve the armor or defensive item of the character that repeatedly dies first.
  • Delay Anuphet’s Warriors until they create a meaningful numerical swing.

Closing note

Deny the clean opening volley and use summons as protective geometry.

25

Elite 25 — Cautious Reconnaissance

Why players struggle

The first battle after a major checkpoint punishes players who assume the next chapter begins gently.

Strategy

  • Recheck movement and attack ranges instead of relying on the Normal map.
  • Advance with one repairable anchor while the rest stay outside concentrated fire.
  • Target enemies by projected next-turn damage.
  • Keep a ranged finisher ready for low-health threats.
  • Use terrain so only one or two enemies can reach the anchor.

Closing note

Force the enemy to reveal its approach, then collapse on the first separated unit.

30

Elite 30 — Fight One Flank

Why players struggle

Overlapping enemy ranges make a central advance produce more damage than Aleph-Null can repair.

Strategy

  • Choose one flank during deployment and commit the roster to it.
  • Reveal the first attack with the toughest Necron.
  • Kill high-damage ranged enemies before durable blockers when access permits.
  • Use summons to delay the opposite side.
  • Rotate injured units backward and preserve Imospekh’s strongest Overwatch lane.

Closing note

Create local superiority while summons and terrain postpone the rest of the enemy formation.

31

Elite 31 — Ability Economy

Why players struggle

Spending actives like this is the chapter-ending battle can leave the roster exposed during the final wave.

Strategy

  • Use basic attacks for guaranteed kills and save actives for consequential thresholds.
  • Summon only when the units alter targeting, movement, or numbers.
  • Keep retreat hexes open behind forward units.
  • Repair before attacking when a damaged hero cannot survive another activation.
  • Regroup instead of chasing the final targets into exposed terrain.

Closing note

Let positioning do work that would otherwise require raw statistics or early abilities.

32

Elite 32 — Chapter Boss Priority

Why players struggle

The decisive turns require choosing between support threats and the main target without splitting damage inefficiently.

Strategy

  • Determine whether the boss can be removed in one concentrated turn.
  • Redirect the first major activation into a summon.
  • Remove healers, summoners, multi-attack units, and back-line threats first.
  • Keep Aleph-Null within repair range of the intended tank.
  • Time Anuphet’s Warriors for the transition from support clearance to boss focus.

Closing note

Clear whatever amplifies the enemy’s next turn, then synchronize healing and burst damage on the boss.

37

Elite 37 — Defensive Optimization

Why players struggle

Late Elite exposes the difference between fast favorable clears and a roster durable enough to survive unfavorable targeting.

Strategy

  • Move the best defensive items to the two likely targets.
  • Stay within a compact repair radius until ranged threats are gone.
  • Use summons to deny access to fragile units.
  • Move an injured damage dealer completely out of combat when necessary.
  • Change deployment or the first target when the same enemy activation repeatedly ends the run.

Closing note

Reduce variance through defense, compact positioning, and predictable enemy targeting.

39

Elite 39 — Three-Star Discipline

Why players struggle

The final pre-boss mission is often lost after the battle is effectively won because a damaged required hero remains exposed during cleanup.

Strategy

  • Keep an exit route toward Aleph-Null.
  • Save summons, repositioning, or burst tools that can protect a unit.
  • Remove enemies that can reach past the tank.
  • Repair to a safe threshold before the final enemy group.
  • Reposition the damaged roster before chasing the last kill.

Closing note

Knowing when to stop advancing prevents avoidable two-star completions.

40

Elite 40 — Final Boss Sequence

Why players struggle

Maximum campaign stats combine with a boss-priority problem, and the wrong order of summons, repairs, and burst abilities can cost the third medal.

Strategy

  • Choose the boss tank before the first move and preserve Aleph-Null’s repair path.
  • Separate support clearance from the boss commitment.
  • Block access to the back line with Scarabs or Warriors.
  • Remove healers, summoners, multi-attackers, and tank-bypass threats first.
  • Preserve one burst active for the isolated boss.
  • Confirm that no surviving enemy can retaliate before the final hit.

Closing note

Absorb the opening, remove support threats, isolate the boss, and finish with repair and burst resources available.

Bosses

The five Indomitus Mirror bosses appear at Normal Stages 15, 30, 45, 60, and 75. Their Elite chapter encounters occur at Stages 8, 16, 24, 32, and 40.

Sergeant Bellator portrait

Bellator

Normal 15Elite 8

Use Scarabs to block Bellator and his Inceptors instead of racing them for damage.

Keep the required backline outside charge routes while Aleph-Null anchors the first exchange.

Finish Bellator only after his summons can no longer reach a fragile Necron.

Sergeant Certus portrait

Certus

Normal 30Elite 16

Respect Certus’s range and use terrain to force movement before entering his firing lane.

Offer a summon or durable anchor as the first legal target, then collapse with ranged pressure.

Do not expose Imospekh merely to trade one shot with Certus.

Varro Tigurius portrait

Varro Tigurius

Normal 45Elite 24

Avoid clustering several Necrons where Varro’s psychic area damage can compromise the entire formation.

Use Scarabs to obstruct the approach while the main roster attacks from separate but repairable positions.

Elite 24 is a survival check: protect the weakest required Necron before maximizing damage.

Apothecary Incisus portrait

Incisus

Normal 60Elite 32

Prioritize Incisus before committing fully to the other enemies; repeated healing can erase unfocused damage.

Deny safe repair targets by finishing one enemy at a time.

Hold Thutmose or another burst option for the turn Incisus becomes reachable.

Marneus Calgar portrait

Marneus Calgar

Normal 75Elite 40

Clear the supporting enemies that amplify pressure, then surround and burst Calgar in a controlled exchange.

Use Scarabs or Warriors to block his route to the weakest Necron and keep the chosen tank within Aleph-Null’s repair path.

Elite 40 rewards a turn plan more than a damage race: preserve summons and burst damage for the decisive boss turn.

Campaign Replay Filters

Stuck on a specific stage? Select the difficulty and stage number to compare team compositions, hero ranks, and successful strategies.

Every recommendation on this page is supported by campaign research, documented clears, or the Terminus Maximus Campaign Replay Library. Use the filters below to find successful Indomitus Mirror runs for any available Normal or Elite stage.

Compare teams carefully. A low-rank clear may depend on stronger equipment, a premium supporting hero, a heavily developed carry, favorable enemy movement, or exact turn-by-turn positioning. The most useful replay is not always the one with the lowest ranks—it is the one whose roster and investment most closely resemble your own.

More Filters

Mode

Campaign Replays

Normal 15 4 replays
Normal 29 3 replays Plasmancer Thutmose
Normal 30 4 replays Plasmancer ThutmoseOverlord Anuphet
Normal 45 3 replays Plasmancer Thutmose
Normal 60 3 replays Plasmancer ThutmoseOverlord Anuphet
Normal 61 3 replays Plasmancer ThutmoseOverlord Anuphet
Normal 62 3 replays Plasmancer ThutmoseOverlord Anuphet
Normal 63 3 replays Plasmancer ThutmoseOverlord Anuphet
Normal 64 5 replays Plasmancer ThutmoseOverlord Anuphet
Normal 65 4 replays Plasmancer ThutmoseOverlord Anuphet
Normal 66 3 replays Plasmancer ThutmoseOverlord Anuphet
Normal 67 4 replays Plasmancer ThutmoseOverlord Anuphet
Normal 68 2 replays Plasmancer ThutmoseOverlord Anuphet
Normal 69 3 replays Plasmancer ThutmoseOverlord Anuphet
Normal 70 5 replays Plasmancer ThutmoseOverlord Anuphet
Normal 71 4 replays Plasmancer ThutmoseOverlord Anuphet
Normal 72 4 replays Plasmancer ThutmoseOverlord Anuphet
Normal 73 4 replays Plasmancer ThutmoseOverlord Anuphet
Normal 74 2 replays Plasmancer ThutmoseOverlord Anuphet
Normal 75 7 replays Plasmancer ThutmoseOverlord Anuphet
Elite 1 2 replays Plasmancer ThutmoseOverlord Anuphet
Elite 2 2 replays Plasmancer ThutmoseOverlord Anuphet
Elite 3 1 replay Plasmancer ThutmoseOverlord Anuphet
Elite 4 3 replays Plasmancer ThutmoseOverlord Anuphet
Elite 5 2 replays Plasmancer ThutmoseOverlord Anuphet
Elite 6 2 replays Plasmancer ThutmoseOverlord Anuphet
Elite 7 1 replay Plasmancer ThutmoseOverlord Anuphet
Elite 8 1 replay Plasmancer ThutmoseOverlord Anuphet
Elite 9 1 replay Plasmancer ThutmoseOverlord Anuphet
Elite 10 1 replay Plasmancer ThutmoseOverlord Anuphet
Elite 11 1 replay Plasmancer ThutmoseOverlord Anuphet
Elite 12 1 replay Plasmancer ThutmoseOverlord Anuphet
Elite 13 1 replay Plasmancer ThutmoseOverlord Anuphet
Elite 14 1 replay Plasmancer ThutmoseOverlord Anuphet
Elite 15 1 replay Plasmancer ThutmoseOverlord Anuphet
Elite 16 1 replay Plasmancer ThutmoseOverlord Anuphet
Elite 17 1 replay Overlord Anuphet
Elite 18 1 replay Overlord Anuphet
Elite 19 1 replay Overlord Anuphet
Elite 20 1 replay Overlord Anuphet
Elite 21 1 replay Plasmancer ThutmoseOverlord Anuphet
Elite 22 2 replays Overlord AnuphetPlasmancer Thutmose
Elite 23 1 replay Overlord Anuphet
Elite 24 1 replay Overlord Anuphet
Elite 25 1 replay Overlord Anuphet
Elite 26 1 replay Overlord Anuphet
Elite 27 1 replay Overlord Anuphet
Elite 28 1 replay Overlord Anuphet
Elite 29 1 replay Overlord Anuphet
Elite 30 2 replays Plasmancer ThutmoseOverlord Anuphet
Elite 31 2 replays Plasmancer ThutmoseOverlord Anuphet
Elite 32 3 replays Plasmancer ThutmoseOverlord Anuphet
Elite 33 1 replay Plasmancer ThutmoseOverlord Anuphet
Elite 34 1 replay Plasmancer ThutmoseOverlord Anuphet
Elite 35 1 replay Plasmancer ThutmoseOverlord Anuphet
Elite 36 1 replay Plasmancer ThutmoseOverlord Anuphet
Elite 37 1 replay Plasmancer ThutmoseOverlord Anuphet
Elite 38 1 replay Plasmancer ThutmoseOverlord Anuphet
Elite 39 5 replays Plasmancer ThutmoseOverlord Anuphet
Elite 40 8 replays Plasmancer ThutmoseOverlord Anuphet

Campaign Replay Statistics

These ranks change as you apply Filters

Royal Warden Makhotep portrait
Makho Elite: 40 stages Normal: 20 stages
Max Rank
Gold III rank badge
Gold III
Hexmark Destroyer Imospekh portrait
Imo Elite: 40 stages Normal: 20 stages
Max Rank
Gold II rank badge
Gold II
Canoptek Spyder Aleph-Null portrait
Aleph Elite: 40 stages Normal: 20 stages
Max Rank
Diamond I rank badge
Diamond I
Overlord Anuphet portrait
Anu Elite: 40 stages Normal: 17 stages
Max Rank
Gold II rank badge
Gold II
Plasmancer Thutmose portrait
Thut Elite: 29 stages Normal: 19 stages
Max Rank
Gold III rank badge
Gold III